Reply with Quote
Made some videos of my plasma machine running..
My web site Ivan's Garage
http://www.ivanbennett.com/images/plasmarun1.wmv
http://www.ivanbennett.com/images/plasmarun2.wmv


Kind of new to this forum stuff posting, but got a web site with pics of my
machine. www.ivanbennett.com
Similar Threads:
- Jim Colt talks about Conventional Air Plasma VS HyDef Plasma
- Has anyone bought the new Patriot 4x8 CNC plasma cutting table from Precision Plasma
- CNC plasma machine works with spindle and plasma cutting torch
- Precision Plasma LLC 2x2 Portable Plasma Tables for $1950
- Just IN- Precision Plasma LLC 6" rotary chuck for CNC plasma cutting
Last edited by ivansgarage; 03-24-2011 at 06:34 AM.
Made some videos of my plasma machine running..
My web site Ivan's Garage
http://www.ivanbennett.com/images/plasmarun1.wmv
http://www.ivanbennett.com/images/plasmarun2.wmv
No there is no cone switch.. One less thing to go wrong. Cut the 3 wires off Blue-cone-switch,
purpple-torch-fire and orange-common slid a piece of heat shrink tube over wires..
Last edited by ivansgarage; 06-17-2011 at 11:46 AM.

You do not need pin-6-purpple wire Torch fire wire for hand torch.
So i moved pin-6 to pin-8..
Connecting Pin 7-orange and pin 8 is what changes the machine to machine-torch mode.
I know this was hard to do, to take a brand new torch And tear it apart, but just could not see paying 650 for a machine torch.
There was no modes done to the machine..
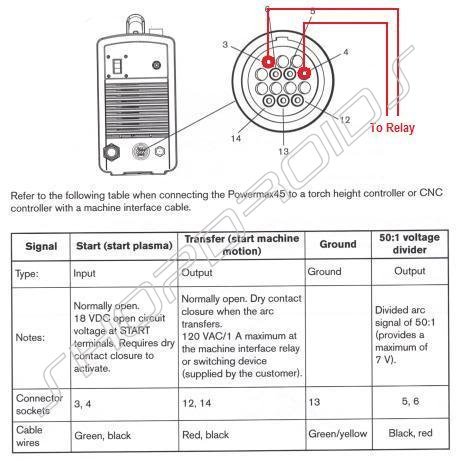
Know the machine interface plug (on back of machine) pins 3 and 4 fires the torch.. fn perfect..
Last edited by ivansgarage; 06-18-2011 at 11:53 PM.
What are you guys using for a plasma post.
I got the lcthc..
I didn't have to cut any wires. I took the rear plug apart and pulled pin 6 out and put it in pin 8 slot. Then take the torch handle apart, remove the trigger switch (not the red trigger) and put a wire shunt across the 2 pins and tape it up. Put the handle back together and you have a torch that works like the machine torch. If you ever want to convert it back, just move pin 8 back to 6 and put the switch back in.
As for the plasma post, if you're talking about Sheetcam, I just use the MAch3 plasma post. Seems to work pretty good.
Willy
Very good detail on your conversion. Do any of you know if this is the same for the PM 85 torch?
The schematics I have don't specify either the 65 or 85. However, the interface kit , part # 223036, to install the CPC port wiring and voltage divider board is the same for both the 65 and 85. Since the CPC port is wired the same in both machines, the torch wiring would have to be the same. Also, the torch leads and receptacles are the same for the 65 and 85.
The good thing is that you can always put it back if it is different but I don't think it is.
Willy
Thanks willy for the quick response....so everything in this post is for the 65 or 45? I have a 85 and almost have completed the hand to machine conversion but the safety is the last hang up.
The good thing about moving pin 6 to 8 and shunting the trigger switch is that it can no longer be used as a hand torch. It can only be fired from the CPC port. Also, the other safety switches are still in place so if the consumables (cap, nozzle, etc) are loose or missing, the torch won't fire.
The plug pinouts are 1 & 2 is the pilot arc, 5 is the cap sense safety, 6 is the start lead, 7 is common, 8 is the mech torch pin. Looking at the plug end with the guide slot at 12 o'clock, the pins count clockwise. You should have 1,2,5,6, & 7.
My extra torch (15 deg) is ALWAYS bolted to the table like a machine torch so I don't have to worry about someone using it as a hand torch.
Good luck
Willy
I also have a #11 pin. do I need to worry about that one. My torch will also only be used as a machine torch you will see Y when I post pics. Thanks
Pin #11 is labeled AMP0. I have it also. I believe it is for torch current but I don't know for sure. The only pin I touched was 6 and everything works great.
Willy
cool, well Ive already moved pin 6 and spliced out the trigger plug...don't know y I did that ...more safety I guess....I will hook up now and post how it went....Thanks Willy I appreciate all the help
YES......Willy thank you!...Pics to come.
Hey guys here is the links for the cpc connector and pins for the rear plug.
Got the plug and pins for 5 bucks from Allied Electronics
Plug
TE Connectivity - 206044-1 - Circular Connectors - Connectors - Allied Electronics
Pins
TE Connectivity - 66103-4 - Circular Connectors - Connectors - Allied Electronics
Ivan's Garage DIY CNC Plasma
Here is the finished Hand torch to Machine torch
Here is the other post pics on torch conversion..
http://www.cnczone.com/forums/plasma..._plasma-2.html
Ivan's Garage DIY CNC Plasma
Last edited by ivansgarage; 07-16-2011 at 07:32 PM.
Had to build a new compressor for my plasma cutter.
10 cfm cambell hausfield compressor head, A 3 horse motor,
and 125lb freon jug-15 gallon...
http://www.ivanbennett.com/
Last edited by ivansgarage; 08-23-2011 at 09:53 PM.
Wow! I love those compressors. Great site.Originally Posted by ivansgarage

Anything is possible, just build it!
Hi guys ! My thermal Dynamics Plasma Cutter just quit on me.
I just bought a Brand new PowerMax 45 . Does anyone have a wiring diagram for the trigger wires for remote CNC start? Any help is appreciated !
 Posting Permissions