homemade 3D touch probe? - Page 3


Page 3 of 3 FirstFirst 123
Results 41 to 56 of 56

Thread: homemade 3D touch probe?

  1. #41
    Member handlewanker's Avatar
    Join Date
    Sep 2006
    Location
    Australia
    Posts
    6463
    Downloads
    0
    Uploads
    0

    Default

    Hi, pretty interesting....the object will always be to accurately copy the target to reproduce it with the mill........with whatever means so far devised if the outcome is as good as the target then the solution is already solved.

    With that thought in mind, how much more accurate for $2,350 is the Heidenhain model compared to the $90 dollar Renishaw device, both on EBAY, and I assume they both work on the same principle.

    If there is a whole field of difference in the accuracy of the plot in a side by side comparison, then the problem of DIY making is the key......where does the problem lie if it only needs 3 sets of balls and 3 round rods to do the sensing.

    In the magnet design I'm working on there would be 3 sets of magnets top and bottom at 120 deg that opposed the central shaft, so holding it in suspension in a magnetic field......this already exists in a magnetic bearing design and I intend to look closely at that principle to see if it has merit on a smaller scale.

    The shaft could be mounted in a tube with silicon rubber, but it has no adjustment for sensitivity, but it still has possibilities if used in only small doses.

    Silicon rubber, if used as small bushes inside a tube and the OD of a shaft, would work in all directions once cured, so there are endless simple possibilities........the shaft only has to move .02mm at most.

    I can quite well imagine that the probing cycle would take quite a few hours probing at the rate of one step forward each time and one step sideways for the next row of hits.

    I think that I would have mostly an all round type probing need as opposed to a purely 2D or flat plane one, and that would mean the 4th axis I've got planned is going to get moved up the ladder of priority a notch or two.
    Ian.


  2. #42
    Member JerryBurks's Avatar
    Join Date
    Aug 2011
    Location
    USA
    Posts
    999
    Downloads
    0
    Uploads
    0

    Default

    Quote Originally Posted by handlewanker View Post
    ...the object will always be to accurately copy the target to reproduce it with the mill......
    Well, in my case I was rather interested in making the gcode conform with a given surface.

    Quote Originally Posted by handlewanker View Post
    ....I can quite well imagine that the probing cycle would take quite a few hours probing at the rate of one step forward each time and one step sideways for the next row of hits.....
    Depends obviously on the size and required accuracy. I did another test to digitize a coin at high resolution, see below. That took about 10 minutes IIRC.

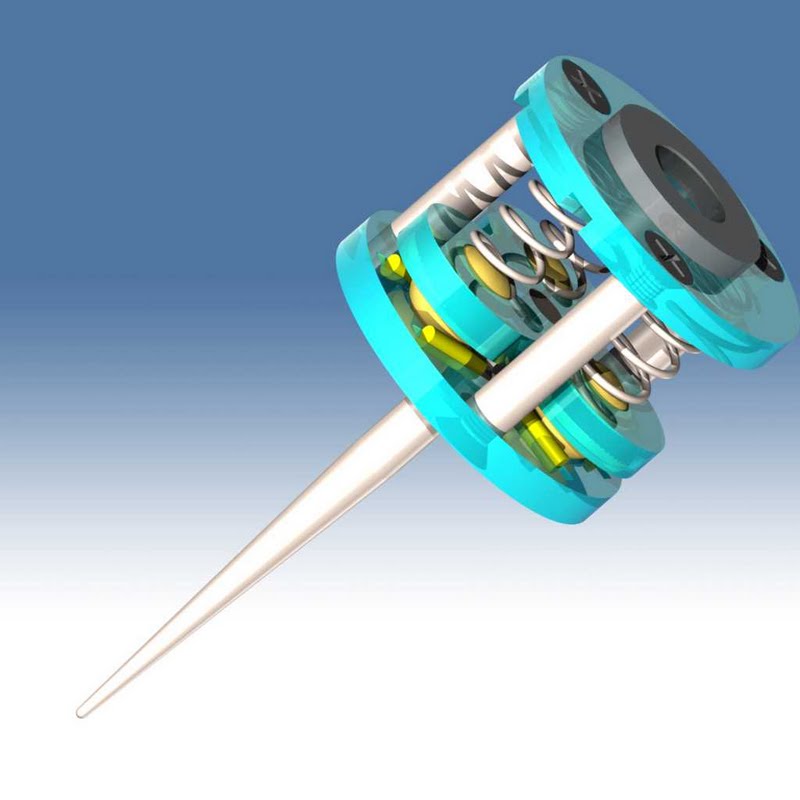
    For such a task the machine sounds like a woodpecker and the resulting z-accuracy was about 5/1000". I am not sure how much of that was the probe and how much the router but for real good results you need a fast and very accurate machine. If there is any play in the drives you can forget it. I started out with chrome steel bearing balls and brass contact rods on my probe but got better results later after switching to steel rods, gold plated the contact surfaces and kept them wet with a drop of oil.


    Height exaggerated by factor of 10 to show the surface


    Puzzle, Finger Joint, Maze and Guilloche freeware at https://fabrikisto.com/tailmaker-software/


  3. #43
    Member handlewanker's Avatar
    Join Date
    Sep 2006
    Location
    Australia
    Posts
    6463
    Downloads
    0
    Uploads
    0

    Default

    Hi, now that last picture would make an ideal sculpture.....are you intending "making" some money with the router....LOL.

    I can see that the sample rate determines the final rendition.

    So........right from the beginning the probing mill I am designing must have pretty well near perfect positioning capability, with linear slides all the way to obtain the detail for the actual mill to work on, and that would mean spending the most money for the slides....the rest can be off the shelf general purpose stuff.

    The one piece aluminium column and base will both have an L shaped channel form mounted on a slab aluminium base, but this too might be made from steel channel iron or plain square tubing as it's easy to weld and finish without having problems from temperature variations moving the structure out of alignment.

    The more I think of it the more I like the idea of a fully welded square steel tubing structure all the way......column and base from 150mm X 75mm 3mm wall tube, but all the moving parts like the table, saddle and Z axis slide from aluminium to cut down the inertia.

    The z axis slide will only have the probe mounted on it, so it will be extremely light and sensitive, so allowing very fast pecking cycles with deceleration and acceleration to speed the sampling rate.

    To cut down on the weight being moved, and inertia, the ball screw will be fixed to the saddle, and the nut, attached to the bottom of the table, will move on the screw.....that means also that the table will have linear bearings and the saddle the linear rails.

    The design for the probe itself is gravitating to a central shaft of aluminium, about 8mm diam, with a series of magnets around it to give it a suspended in a magnetic field effect inside an aluminium tube with a similar set of magnets arranged to have the shaft floating in the middle of the tube and held there by the force of the magnetic field.

    The magnets will not be subject to fiddly spring pressure adjustments and once set up will remain static.......the probe only has to move .02mm in any direction to register a hit.

    I like the idea of the gold plated contacts, and at the same time will add some capacitors across the contact gap to cut out any sparking that would occur.....plain brass on steel would soon have a burnt contact zone.

    Now it will be graphics pad time to design the magnet configuration to allow the shaft to float in space using the ND magnets on EBAY.

    The magnets will be opposing each other so the closer they are placed in polarised pairs the stronger the force and that can be adjustable to get the sensitivity.

    The beauty of using magnets is, using the same sizes, they all push with the same force and once aligned will hold the shaft fairly rigid.

    I originally designed the probe to have 2 linear ball bush bearings for the centralising of the shaft with a gimbal mount at the bottom , but that had problems in itself for alignment etc, and as the movement only had to cater for .02mm each way the bearings and gimbal were overkill, and I want to have simplicity as a password all the way, enter the central mag lift....LOL.

    I've come to the conclusion that using magnets the probe can be made very compact, probably not more than 20mm diam and with a body of 40mm long.....the probe pointy bit length itself being whatever is practical.......it will have one type with a needle point, another with a parallel one and another with a ball end, all for different purposes.
    Ian.


  4. #44
    Member
    Join Date
    Mar 2010
    Location
    United States
    Posts
    621
    Downloads
    0
    Uploads
    0

    Default

    Jerry,

    I'd love to give your setup a go, PM me or post your files.

    Thanks.

    Adam,

    G540, Rack and Pinion Drives-X/Y axis, 1/2-Ball Screw-Z Axis w/THK HSR 25 Linear Slides, Steppers KL23H2100-35-4B, Power Supply-KL-600-48


  5. #45
    Member JerryBurks's Avatar
    Join Date
    Aug 2011
    Location
    USA
    Posts
    999
    Downloads
    0
    Uploads
    0

    Default

    Quote Originally Posted by adam_m View Post
    Jerry,

    I'd love to give your setup a go, PM me or post your files.

    Thanks.

    Adam,
    2d and 3d Design files are here as well as VcarvePro and g-code.

    I made this from 3/16" acrylic sheet. I believe I bough the threaded spacers, steel balls, springs and steel pins (1/8" dowels) from McMaster Carr but not sure anymore.

    there are 2 short jumper wires connecting 2 sets of pins and the hookup cable is connected the the 3rd set of pins. When all 3 balls are resting on the dowel pairs there is a connection. If one or more balls lift off, the connection is broken. The cable is glued into the U-shaped channel in the top plate for strain relief.

    Since the steel pins are hard to solder, I used conductive silver epoxy to connect with the wires and cable.

    There is a ring shaped rare earth magnet in the back so that I can attach the probe to any steel surface. But a rod to go into a collet would work as well (assuming good spindle bearings).

    JB

    Puzzle, Finger Joint, Maze and Guilloche freeware at https://fabrikisto.com/tailmaker-software/


  6. #46
    Member bill south's Avatar
    Join Date
    Apr 2005
    Location
    usa
    Posts
    1268
    Downloads
    0
    Uploads
    0

    Default

    Hey Jerry;
    I'd like to have a copy of the files for the touch probe. I thought I had them already but I think it was in a former life (or former computer).
    Many Thanks.
    Bill

    billyjack
    Helicopter def. = Bunch of spare parts flying in close formation! USAF 1974 ;>)


  7. #47
    Member JerryBurks's Avatar
    Join Date
    Aug 2011
    Location
    USA
    Posts
    999
    Downloads
    0
    Uploads
    0

    Default

    Quote Originally Posted by bill south View Post
    Hey Jerry;
    I'd like to have a copy of the files for the touch probe......

    The download link is in my previous post (#45), right under the "Quote" box. It is a little hard to see (light blue, not underlined).

    Puzzle, Finger Joint, Maze and Guilloche freeware at https://fabrikisto.com/tailmaker-software/


  8. #48
    Member
    Join Date
    Jul 2003
    Location
    Peoples Republic of Wisconsin
    Posts
    168
    Downloads
    0
    Uploads
    0

    Default

    @JerryBurks

    I was stunned by your beautiful design.

    How about a stone carving? (Oh, but that'll probably mean having to set up a spray system.)

    Cheers!

    --
    Dan


  9. #49
    Member
    Join Date
    Mar 2015
    Posts
    70
    Downloads
    2
    Uploads
    0

    Default Re: homemade 3D touch probe?

    HI jerry,

    I cant see a ball on the tip.... Is the ball really necessary ?

    I would thank for the CAD files.

    Best regards.


    [/QUOTE]

    Live long and prosper.


  10. #50
    Member JerryBurks's Avatar
    Join Date
    Aug 2011
    Location
    USA
    Posts
    999
    Downloads
    0
    Uploads
    0

    Default Re: homemade 3D touch probe?

    No, there is no separate ball on the tip but the tip is ground to a hemisphere of approx. 1mm diameter. A larger ball would prevent scanning fine details and this is not intended to touch off with micrometer accuracy on hard metal surfaces.

    The originally posted CAM files got lost in a Dropbox accident when they changed their file links but I still have a 3D Step file of the assembly that can be downloaded here: https://www.dropbox.com/s/xxhk4obw86...Probe.stp?dl=0
    Hope that helps.

    JB

    Puzzle, Finger Joint, Maze and Guilloche freeware at https://fabrikisto.com/tailmaker-software/


  11. #51
    Member
    Join Date
    Mar 2015
    Posts
    70
    Downloads
    2
    Uploads
    0

    Default Re: homemade 3D touch probe?

    Dear Jerry Burks,

    I am planning to copy metallic parts for molds. Can i use fixed pin type probe for getting the 3D point data.

    - - - Updated - - -

    and thanks a lot for the CAD file

    Live long and prosper.


  12. #52
    Member JerryBurks's Avatar
    Join Date
    Aug 2011
    Location
    USA
    Posts
    999
    Downloads
    0
    Uploads
    0

    Default Re: homemade 3D touch probe?

    Depends on your accuracy requirements. I would not expect better than maybe 1/10 to 2/10 mm from this type of mechanical probe, and this assumes also, that your controller and probe software support that. Another limitation is how steep the side surfaces of the probed features are.
    For better contact reliability I plated the hardened steel ball and pins with gold (using a plating kit from the Internet).

    Puzzle, Finger Joint, Maze and Guilloche freeware at https://fabrikisto.com/tailmaker-software/


  13. #53
    Member
    Join Date
    Mar 2015
    Posts
    70
    Downloads
    2
    Uploads
    0

    Default Re: homemade 3D touch probe?

    Hi Jerry,

    please correct me when i say that if machine' accuracy is say 0.05 mm and i am using bits no smaller than 0.1 mm tip engraving V bit do i need more accuracy than 0.1 mm.

    Also if i am planning to make wax or wooden patterns for molds for casting automotive parts is not the accuracy of say 0.1 mm enough ??
    Best regards.

    Live long and prosper.


  14. #54
    Member JerryBurks's Avatar
    Join Date
    Aug 2011
    Location
    USA
    Posts
    999
    Downloads
    0
    Uploads
    0

    Default Re: homemade 3D touch probe?

    Quote Originally Posted by shujaa View Post
    Hi Jerry,
    please correct me when i say that if machine' accuracy is say 0.05 mm and i am using bits no smaller than 0.1 mm tip engraving V bit do i need more accuracy than 0.1 mm.
    Also if i am planning to make wax or wooden patterns for molds for casting automotive parts is not the accuracy of say 0.1 mm enough ??
    Best regards.
    Hmm, sounds like this should work but I have no experience with mold making and the required accuracies.

    Puzzle, Finger Joint, Maze and Guilloche freeware at https://fabrikisto.com/tailmaker-software/


  15. #55

    Default

    Quote Originally Posted by JerryBurks View Post
    I am late to the party....but if anybody is interested in the machining files for this design I can post it. Works pretty well.

    Just found this and looking to make a probe any chance of the files of the part in it please
    Cheers. Paul


  16. #56
    Member Frostwood's Avatar
    Join Date
    Mar 2021
    Posts
    1
    Downloads
    0
    Uploads
    0

    Default Re: homemade 3D touch probe?

    Quote Originally Posted by JerryBurks View Post
    I am late to the party....but if anybody is interested in the machining files for this design I can post it. Works pretty well.

    Hey Jerry,

    I hope I'm not late to the party too... I would like to have the files to your design. I checked the thread, but the link has been expired.

    looking forward to your reply


Page 3 of 3 FirstFirst 123

Tags for this Thread

Posting Permissions

  • You may not post new threads
  • You may not post replies
  • You may not post attachments
  • You may not edit your posts
  •  


About CNCzone.com

    We are the largest and most active discussion forum for manufacturing industry. The site is 100% free to join and use, so join today!

Follow us on


Our Brands

homemade 3D touch probe?

homemade 3D touch probe?