Reply with Quote
I hope you get some dust collection on there soon. I can't believe you surfaced the spoilboard without it.


Here's a video of the PCB being machined. It's funny that the retrofit makes it's own parts.
The green tape was just used to help hold the edge down, but really the vacuum did a great job and it probably was not a lot of help anyways. One thing I've always noticed about machining thin material is that the upshear bits can sometimes pull the sheet up a bit, allowing chips to get under the edge. Once that happens, there is no way to hold the part down as it can't seal to the surface. The tape also helps prevent that from happening, though a down spiral bit is preferred for thin parts like this, since it actually aids in holding the part down.
Tonight I have to draw up the other half of the circuit (LEDs) so that it can be machined tomorrow. Then I can start assembling the control panel and installing it.


I hope you get some dust collection on there soon. I can't believe you surfaced the spoilboard without it.
Gerry
UCCNC 2017 Screenset
[URL]http://www.thecncwoodworker.com/2017.html[/URL]
Mach3 2010 Screenset
[URL]http://www.thecncwoodworker.com/2010.html[/URL]
JointCAM - CNC Dovetails & Box Joints
[URL]http://www.g-forcecnc.com/jointcam.html[/URL]
(Note: The opinions expressed in this post are my own and are not necessarily those of CNCzone and its management)
Tell me about it, Gerry! It will take me a week to clean the shop now.
I've been renovating my two car garage into a dedicated shop, so the project is even bigger than just the router itself. One of the down sides of making your shop in your garage is that the power supply leaves a bit to be desired. I had a 100 amp service brought in from my home's 200 amp service, but it may not be enough. The concern is that there will be times when a dust collector, air compressor and the router (vacuum pump + two 4kw heads) will all run simultaneously. The router runs on a 30hp phase converter, which is so far working comfortably on a 60amp breaker. Hopefully, the router will run at around 35 amps with both heads operating and the vacuum pump running, which I think is doable. If that's the case, then I've got plenty of room for a 3-5 hp dust collector and my lungs will be fine.
I also need to fabricate the dust shroud, which was missing when I bought the machine. The punch list is still quite long, even though the machine is running.
Thanks again for a great screenset! I highly recommend Gerry's 2010 Mach screenset and thoroughly enjoy it myself. Once I've got the entire control panel together, I'll get some good photos of the screenset in action.
I use the 45 degree insert engraving cutter from Nine9 and it works great, think in stainless its something like 0.05mm/rev and almost double in Alu. Just a shame I dont have the 20K spindle speed to take advantage
Always looking out for a spindle speeder but dont do enough engraving type work to justify buying one new.
Hood
I have seen a few people use engraving bits for PCBs, but hadn't really thought about it from a strength standpoint until you mentioned yours. I can see how you'd be able to run much higher speeds given that the bit is not just a thin helix ready to snap at any awkward glance. I'd bet it could be run at well over 1000mm/min on a PCB, which would make it far more cost effective. Where did you find that bit, Hood? I see their webpage, but don't see any dealers.
I got mine from J and L in the UK, or MSC Direct as it is now called.
Just did a Google search for dealers in the USA and closest I could find is Canada but it was just a quick search so probably more.
Caliber Industrial Supply - Nine9
Hood
I spent the morning installing a new encoder on one of the unused channels for testing. The encoders I'm using currently are 500ppr which provide 2000ppr after the multiplier. When mounted to a 20mm pitch lead screw, that's only .01mm/rev resolution, so not so great really. My friends at Rauda Scale Models had ordered some of the CUI AMT-102 encoders for the retrofit I helped them out with (CS Labs CSMIO IP-M controller for that one), but ended up just reusing the encoders that they already had. I asked Sig to borrow one for testing to see if they are compatible with the IP-A, which is what I tried out today (they were ordered due to compatibility with Gecko drives, since the encoders don't feed back to the IP-M). The CUI encoder provides 2048 ppr that ends up at 8192 ppr after the multiplier, so a reasonable upgrade from the old encoders provided they work.
As it turns out, they appear to work well with the IP-A. Once the encoder was configured in Mach 3 and the CS Labs plug-in, the plug-in would read-out the position without issue. Since I was turning the encoder by hand, the Reset in Mach 3 had to be off to see the position change on the DRO, but it read out properly and matched up with what is would show if the encoder was actually on a motor. One rotation to display a read-out of 8192 in the CS Labs plug-in equates to a position of 20 on the Mach 3 DRO (it was set up as if it were on a 20mm lead, so that's perfect).
In the next week or so, I'll be upgrading the encoders to these CUI's, which are only $39 each. It will be interesting to see if the motion and positioning is even smoother, or if it doesn't really make much difference. I'm sure having 4 times the positioning data available won't hurt, so I'm sure it will be $120 well spent.
I'll also have to update everyone on the cost of this retrofit. I'm sure that those who are planning a retrofit, or even a new machine would be able to use that information, and I think I've got most of the costs written down. One of the main expenses that I didn't plan enough for is the cost of the wire. I would estimate that I've spent well over $500 in wiring alone, along with about $100 worth of terminals that were additional to the ones I reused, but it should be kept in mind that I have somewhat long runs with a large number of wires. Probably the equivalent of somewhere around 250-350 15ft wires. I don't know why I didn't think of the wire, but I have been surprised. Otherwise, everything else has been pretty much as I would have guessed.
You should see quite a difference with the encoders
I know I did, originally my servo drives were at the default 4096 pulses per rev and when I increased the interpolation to 15,000 the difference was very noticeable, the CSMIO. I have no increased the interpolation to 26,000 and again there was a difference, not quite so much as first but definitely better.
The thing you have to remember though is your following errors will be bigger but in reality the distance will actually be smaller
Hood
I haven't really updated much on the machine as of late, and still haven't taken the time to update the encoders. However, I did just update to the latest version of the CSMIO IP-A plugin (V2.051) and have some reporting to do on that. After installing the plugin, the servos seemed a bit off compared to previous. Not anything alarming, just a bit off. I noticed a little bit of vibration in more detailed machined surfaces than I previously had noticed, but after checking some of the more recent parts from prior to the update they seemed to also exhibit the same vibration upon changes of direction. Not sure why the servos seemed different and I have no other way to describe that I could tell.
Because of this, I decided it might be a good idea to revisit the servo PID tuning and see if the new plug-in would do things differently with autotune. The results are that the newer plugin definitely tuned them drastically different in terms of numbers for the variables compared to previous, though I'm not sure the results were much different than what I had previously achieved manually. I still have about the same amount of vibration around corners, which leads me to believe there needs to be further adjustment to the servo drives themselves.
The adjustments that I have available externally are S-Value and Z-Value, which are labeled respectively as Speed Scale and 0volt (I think this is to prevent drifting?). Those are the only adjustments I've played with to date, but they don't seem to have a significant effect on the vibration that I'm experiencing. It appears that there are additional pot adjusters on the drive boards themselves, which require removing the drives to adjust. These are for Loop Gain (rigidity) and overload detection, along with two additional pot adjusters that are not given a specification for their function. I'll have to play around with the Loop Gain pot, but I'm not sure if it needs more or less rigidity? I suppose that it may become obvious. I do wish the Loop Gain were did not require drive removal as I'll have to turn the machine power on and off everytime I adjust it.
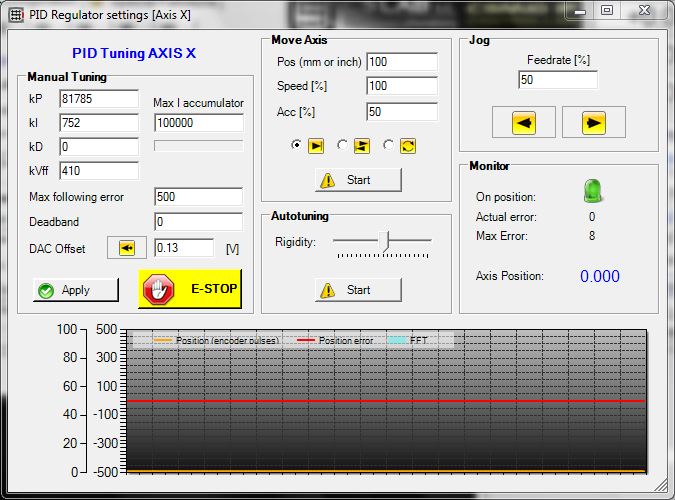
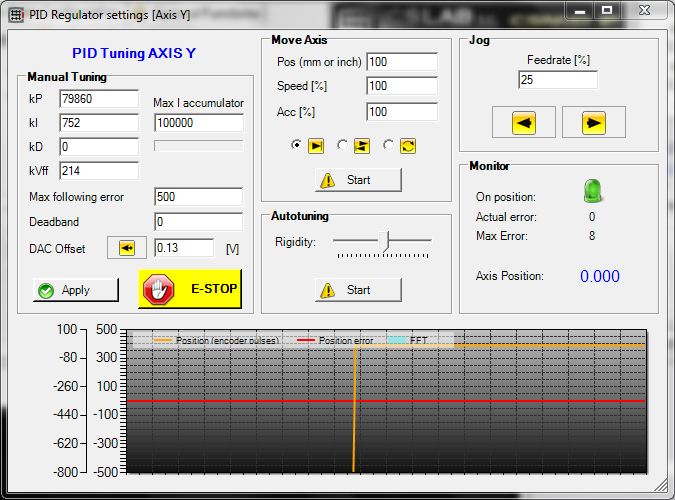
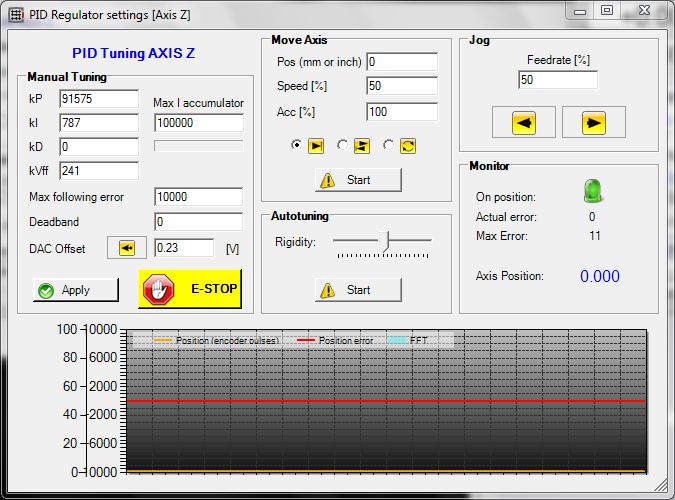
Here's some images of the PID tuning with the latest plugin, V 2.051. The earlier plugin would produce a maximum kP value of around 1200 in autotune, though the kI and kFF numbers were not dramatcially changed (I was running V 2.030, but I don't know if there was one in between). The new kP values are astronomically higher in autotune than previously and they do seem to be working better than even what I thought were high manual kP values of around 4500.
I then restored the factory 50% settings to the S-value and Z-value pots, followed by an increase to the Loop Gain setting on the X and Y axis. They were set at 50%, which is the factory default according to the manual if I'm reading it right. For reference, this is a Japanese written manual from the late 80's and it reads remarkably similar to a current manual from China, which is to say that it's about 40% broken English. This is also by Sanyo, which is not exactly some fly by night small company out of Japan. At any rate, with the Loop Gain set to about 65% (more rigidity if the manual is understood), the kP values dropped in autotune, but the error stayed a little higher than I'd like. I then upped the S-value and Z-value pots to around 65% each as well, and retuned them with autotune. At that point, the autotune achieved what is in the images below. I did not change the Z axis servo drive at all, yet the numbers for kP still shot through the roof compared to the previous autotune and manual tune.
The max error shown may seem a bit high at 8, 8 and 11 for X, Y and Z, but these were my best efforts to create errors by using rapid speeds and changing directions. Keep in mind that the Z axis has twice the mechanical precision of the X and Y axis, so in effect, the numbers are actually showing that it maintains slightly better tolerance than the X and Y axis), but for all practical purposes it's pretty even across the board. This is the true max error in that any other use will be far less demanding and produce less error. In practice, I'm seeing closer to a max error at normal feedrates of around 3, 3 and 5. These errors are observed to be caused right at the start of motion, where the servo is not quite keeping up with the expected trajectory. It may be possible that reducing the acceleration will reduce that even further, but I think I've achieved something near the best case scenario for a router application anyways. We're talking an error in positioning for only an instant, which is approximately .001"-.002". After that initial error, the more important factor is dead on, which is that the error achieves 0 and maintains it through the end of the positioning. Essentially, you get a max of .002" of initial error during acceleration, then no measurable error for the rest of the motion, so I don't know how much more I can improve that on a machine that was not meant to maintain a tolerance of any better than +/-.001" to begin with (and those numbers were probably very optimistic with the original controller!). I also suspect it has never worked better than it is now, since the servo drives appeared as if they had never been adjusted. When I first started tuning the servos, all of the settings were exactly at the 50% mark, which is how they left the factory, so I don't imagine there is any way they were tuned when new in 1991. The dealer was probably supposed to do that upon delivery, but it would seem it never happened.
I'll be running some test and sample parts tomorrow, so I'll see how these changes have helped (or hurt) the actual quality of cut.
Last edited by mmoe; 08-21-2013 at 09:04 PM.
Come across a problem that I have not yet isolated. Since the above tuning and the change tot he new plugin, I can't rapid faster than 9999mm/min. Normally, it's been able to rapid at 20,000mm/min, so it's noticeably slower (I actually thought it was on G01). Not sure if it's an issue to do with the plugin or something else, but the settings in Mach's Motor Tuning are the same, so I'm not sure what's happening really. The only changes I made were to the servo drive pots, the PID tuning and the plugin version, so I'd think it's got to be in those somewhere.
I didnt notice much difference in motors tuning or motion with the latest plugin, maybe a slight difference with MPG jogging but thats it.
Regarding the rapids, I dont think I have that issue, I am sure I would have noticed the difference.
One thing that is a pita is the login crap, I have my machine set up so that I start the computer and it starts up Mach itself but now it will pop up a box saying something about Mach not set to run as Admin. Well I am Admin, only account on computer and as far as I can see no way around it. I asked Wojtek and he send a video of how to get round it doing that, only problem it was Win7 on and XP that I use doesnt have these settings. If it wasnt for Home Off changes I think I would just go back to the older plugin, its that annoying
Hood
I didn't realize that XP would be affected by the admin stuff. It is a PITA, either way. I set my Windows 7 system to not ask for permissions and it does fix it in that case, but the start up is a little slower as well. Plus, I then have to keep the internet off for that computer as that's a serious vulnerability IMHO, and since it's still being run by my laptop instead of something more permanent, that's a bit of an issue. If you are running a dedicated system without internet connectivity, and it runs on Win 7, it isn't an issue at all, but I don't think that covers even the majority of users right now. I've been considering going back to the previous plugin to see if the issue is related, which I'm suspecting it is since I'm not seeing anything else that looks different or incorrectly set.
I am hoping they are working on a fix for the network problem as really I will just have to put up with it if they are not as the Home Off fix is what I wanted
The new plugin has the Home Off as per Machs standard way, or rather they have given you the option to set it that way or choose to have it as CSMIO did.
It will be interesting to see if going back to a previous plugin fixes your issues.
Hood
I'll have to look into the Home Off and see what's new. I've never used mach until I just before I started this thread, so I don't know how Mach does it outside of how it's worked with CS Labs previously.
I think my rapids problem was that I had the feedrate set to 50% for some reason (I think by accident). I didn't realize that the feedrate override also affects the rapids, but apparently it does. My old machine had a manual feedrate override knob, but it only affected the G01 speeds since there is really no reason to override the rapid traverses. At any rate, it appears to be operator error ......... as I find most things are when it comes to machines not behaving.
I found a beauty of a machine on Craigslist today, but I don't think I'll be able to afford it even as much of a steal as I think it is. Plus, it would get hard to move in my pretty modest shop if I added another machine of this size:
I'd love to have twin 5x5 tables to work with the 5x5 Baltic Birch plywood, which I get a lot of request for since it's pretty economical as material goes. The problem for now is that with a 4 foot wide envelope, I end up wasting 1 foot of material that I have to rip off the side before I even put it on the machine. This pretty well eliminates the cost savings on the material because if I am able to reuse the falloff, it adds a bit of extra labor to load it in strips as opposed to machining the whole sheet to start with. The seller is asking $8000, which for a fully operational twin tool changing multitable machine is really a heck of a deal. I'm going to see if they'll take less (as crazy as that sounds), since they do have a time limit before they need the machine moved. Last time I saw a machine of this size, it sold for $999 (see beginning of thread), so I'd hate to miss out on it because I didn't press the issue a bit. I'd rather they say no a couple times than hear that it got scrapped. I just talked to the guys that bought my last machine about 6 years ago and they had done exactly that because they couldn't find a buyer for it when their company split up and failed. You just never know what people will do when they don't want something and have a deadline to move it.
Home Off in Mach actually means Home Offset, in other words it is a value you set to tell Mach how far away from Machine zero that your Home switch is. Say for example you had your home switches fully positive on X and Y, if you had no value in the Home Off box then your machine coords would be set zero there which would mean all machine coords on your machine would be a negative value and if you called a G53G0X0Y0 the machine would move fully positive. If however you set a value equal to the distance the axes are away from Machine zero when homed then a G53G0X0Y0 would take you to the fully negative and all machine coordinate moves would be a positive value for X and Y.
The Way CS-Lab do it is use the Home Off for a distance to move off the switch (or index pulse) after homing. Incidently that is what a lot of new people to Mach think the Home Off value means and they get confused when it doesnt work as they expect. I suspect CS-Lab also thought that was what it was meant for so set things up that way.
Regarding the Feed and Rapid Overrides, you can choose to have them linked or not on General Config page.
I like having mine linked as it means when I start a new programme I can wind the FRO pot down and it also applies to rapids and thus if I have something wrong I am not hurtling a nice shiny new endmill at 20m/min to a nice chunk of stainless
Hood
I probably don't use Home Off the correct way right now and it sounds like I use it the way you describe new Mach users do, but I do need to finish making some new brackets for the home switches before I can really set it up right. My machine homes to the negative on X and Y, positive on Z. The home switches originally tripped when the machine landed on them, and probably coasted a fair bit into the switch before the controller recognized that it was at home. Then you'd tell it you're at zero. Zero, in that sense was a relative term that varied depending on how fast you ran into the home switch or maybe even what day of the week it is. Now, with the home on index feature, the machine backs off the switch and reduces the machining area by about an inch compared to what it was originally. The brackets don't allow me to move the home switch to compensate for this without also changing the limit switch, so I have been using sending the machine back onto the limit switch after it homes to set 0,0,0. When set up this way, you can't home unless you move off of the home switches, so it's going to be a pain until I get those brackets remade.
The problem I have right now is that I have enough work lined up for the machine that I just don't have the time to take things apart. A second machine would sure make these things easier.
Ok no need to remake brackets if I am understanding correctly.
Just set CSMIO to Legacy for Home Off then home the machine. Change to machine coords and jog slowly onto your limit switch (if you have them or extent of travel if not) and you will will then see how far away from the fully negative that your home position is. You then enter that into Home Off in Mach (Config menu then Homing and Limits) Do the same for the other axes.
Now when you home you will notice that instead of the Home switch position being zero it will be the amount it is from true zero, so you now have full access to the travels. It is a good idea to also have your switch triggered constantly from the moment it is hit to the end of the travel in that direction, that means if you tell Mach to home whilst you are on the home switch it will back off rather than travel in the normal homing direction.
Hope I am clear with my description, if not just say and I will try and clarify.
Hood
I think that's what I've set up currently. The Y axis does as you say, even though it's sitting on the home switch. When you go to home it, it moves off the switch by about an inch, then moves back on, then back off to find the index, then back on to my specified Home Off position. The problem is that for some reason the Z axis will not work that way even though it's set up the same. When I go to home the machine, and assuming it was left at it's normal home when shut off, the Z and Y axis are sitting on the switches. If I hit Ref All, the Z does nothing and does not Ref, but it skips to the Y (which is also on the switch) and goes through the homing process I described, then it goes to the X which is not sitting on the home switch at all, and both the X and Y are properly Ref'd. If I back the Z off the switch, it then refs all three in order like normal, Z, Y then X, even though I still left the Y on the switch.
I do use Gerry's 2010 screenset (which I think he did a great job with), and it may have something to do with how it's put together since I recall in his instructions that he highly recommends against setting your home up from the switch. I'll have to look back into that and see what it was about. There are definitely a few things that work a little differently in Gerry's screenset than they do in Mach's standard screenset, but mostly I've found those differences to be improvements. It could be that it's a safety (machine, not personal) implementation that it won't home the Z without it being off the home switch. I do have separate switches for home and limits, so generally I'd be safe anyways if it went up from home.
Just talked with the operator of the SCM I posted a couple posts back, who contacted me on behalf of the seller (seller doesn't even know how it works). It sounds to me like they will take considerably less than the $8000 they are asking. It may seem silly, but in the 15 years or so that I've been either learning about CNC routers or owning them, the dual 5x5 SCM Routron has always been my dream machine. If I could snap my fingers and own a single large piece of equipment, that would be the one, so it's very hard to resist something that fulfills a dream like that even if it is old now. They need it gone by the 6th since they are getting a new Biesse installed then, so time is a factor and they aren't going to want to pay to move it. It's one of those things where the cost of not selling it is greater than the loss of selling it for less or in some cases giving it away. Once in storage, it's a tougher sell to anyone but the most knowledgeable, and they won't pay more than scrap for a machine that is reported to have issues and can't be demonstrated, which means they may not even get their moving or storage fees back. This is a larger business and they just don't have time for that stuff over a couple thousand dollars difference. The machine is begging to have a CS Labs controller installed as the PLC is failing to work with the tool changer. It may be an easy fix since I know the SCM systems pretty well, but if it were you'd think they would have had it fixed in the last 3 years that the operator has had to hand change the tools. One of the heads doesn't work at all (but fortunately for moi, I have one sitting in my garage) and is burned out. The machine is used as is to produce parts day in and day out, so it is functional at a basic level in terms of the servos and the linear bearings/motion parts, but none of the features beyond positioning and turning one spindle on or off are working
In talking with the operator, he was quite surprised to find someone who actually knew both the NUM controller and the SCM machine itself, and I didn't get the impression they've had anyone even call yet after several days. He said he's buy it himself, since he knows what their bottom line really is (wouldn't share, just gave the the "wink wink" they'll listen to lower offers, it isn't about money), but has no where to put it. I do really miss the tool changer, and I know an update to that controller would bring it back to life. Plus, the dual 5x5 tables is really hard to resist from a money making perspective. It would also allow me to leave the Shinx as a 4x4 machine for smaller parts, which would allow me to move it to a more compact footprint (I've left it out where it would be if it had the 4x8 table. I don't know yet how I'd pay for it, or really how I'd get it in my shop, but those seem like minor details.
 Posting Permissions