New Machine Build Saturn 4 X 4 build - Page 2


Page 2 of 6 FirstFirst 12345 ... LastLast
Results 21 to 40 of 116

Thread: Saturn 4 X 4 build

  1. #21

    Default Re: Saturn 4 X 4 build

    Quote Originally Posted by MonsterRobotics View Post
    Going through the threads plus a visit to Nate's shop, I pulled the trigger on the same machine a couple weeks ago. Hoping mine is next in line!.
    Yours should be shipped out on either Monday or Tuesday.

    Fine Line Automation
    www.finelineautomation.com


  2. #22
    Member
    Join Date
    Nov 2012
    Location
    usa
    Posts
    108
    Downloads
    0
    Uploads
    0

    Default Re: Saturn 4 X 4 build

    The right side does indeed need to be reversed. I am sorry about that. We should have caught it here in the factory. I am adding an additional check at the end of our listi.

    To reverse the R&P:
    1) Loosen the tension arm (bolt that runs through the spring) with a 6mm hex key till it comes off.
    2) loosen the collar on the eccentric bearing at the pivot point. There is a set screw that should be facing upward.
    3) loosen the shoulder bolt at the pivot point. Remove the plate from the machine.
    4) Loosen the tensioner mounting block. It uses a 3/16" socket.
    5) Switch the tensioner receiver (the part that the bolt with the spring was threaded into) to the other side. Keep it loose enough to be turned.
    6) Install the pivot arm on the opposite side. When it's torque down, install the collet and tighten on the shaft. Be sure the collet is sitting in the eccentric bearing groove.
    7) Install the tensioner mounting block on the other side. It should be facing straight down.
    8) Thread the tensioner bolt into the receiver. The receiver should be rotated to align with the threads. After you've threaded it in a few turns, tighten the receiver down fully.
    9) Tighten the tensioner bolt down till it is compressing the spring roughly 1/8".

    If you have any other questions about this let me know.
    Thanks, Nate, I got it done. I also had to switch a threaded bushing to the other side for the tensioner receiver.

    I am a little confused about the eccentric bearing...why eccentric?


  3. #23
    Member
    Join Date
    Nov 2012
    Location
    usa
    Posts
    108
    Downloads
    0
    Uploads
    0

    Default Re: Saturn 4 X 4 build

    Got to work on the Saturn a little today...got the steppers and spindle mounted. Had to make a .500 tall spacer so that the Z stepper mounting plate was the right length for the ballscrew and coupler, but that was a no-brainer.

    I continue to marvel at how well made and designed this machine is!

    Attached Thumbnails Attached Thumbnails Saturn 4 X 4 build-img_2285-jpg  


  4. #24
    Community Moderator difalkner's Avatar
    Join Date
    Nov 2014
    Location
    United States
    Posts
    724
    Downloads
    0
    Uploads
    0

    Default Re: Saturn 4 X 4 build

    Quote Originally Posted by sybilsurf View Post
    Got to work on the Saturn a little today...got the steppers and spindle mounted. Had to make a .500 tall spacer so that the Z stepper mounting plate was the right length for the ballscrew and coupler, but that was a no-brainer.

    I continue to marvel at how well made and designed this machine is!
    Looking good!!

    Mine had to have a spacer, as well. After using it for a while I have to say this is a stout machine that looks like you can throw anything at it and it still begs for more! I like mine and just wish I had room for a 4x4.

    David
    Romans 3:23
    CurlyWoodShop - www.etsy.com/shop/CurlyWoodShop
    David Falkner - www.youtube.com/user/difalkner
    difalkner - www.instagram.com/difalkner


  5. #25
    Registered
    Join Date
    Mar 2015
    Posts
    68
    Downloads
    0
    Uploads
    0

    Default Re: Saturn 4 X 4 build

    Quote Originally Posted by sybilsurf View Post
    Got to work on the Saturn a little today...got the steppers and spindle mounted. Had to make a .500 tall spacer so that the Z stepper mounting plate was the right length for the ballscrew and coupler, but that was a no-brainer.

    I continue to marvel at how well made and designed this machine is!
    If you don't mind me asking where did you get the mounting bracket for the air cooled spindle?


  6. #26
    Registered
    Join Date
    May 2012
    Location
    USA
    Posts
    114
    Downloads
    0
    Uploads
    0

    Default

    Cncrouterparts


    Quote Originally Posted by newcarver View Post
    If you don't mind me asking where did you get the mounting bracket for the air cooled spindle?


  7. #27
    Member
    Join Date
    Nov 2012
    Location
    usa
    Posts
    108
    Downloads
    0
    Uploads
    0

    Default Re: Saturn 4 X 4 build

    Quote Originally Posted by newcarver View Post
    If you don't mind me asking where did you get the mounting bracket for the air cooled spindle?
    Yep, Nate said that he had to make one modification I think to make it fit the Z axis. It's quite well made...I'm impressed with Cncrouterparts and Fineline Automation both!


  8. #28
    Member ynnek's Avatar
    Join Date
    Apr 2008
    Location
    USA
    Posts
    196
    Downloads
    0
    Uploads
    0

    Default Re: Saturn 4 X 4 build

    I am very close to pulling the trigger on one of these. Can I get the dimensions for the machine base. To figurw my placement in my garage. i have a decent size garage, 24 x 24 x 20? high, on a concrete slab. I am getting the itch


  9. #29
    Member
    Join Date
    Nov 2012
    Location
    usa
    Posts
    108
    Downloads
    0
    Uploads
    0

    Default Re: Saturn 4 X 4 build

    ynnek, I made my stand 67" wide by 59 1/2" deep. I wish my garage was as big as yours!

    Ward


  10. #30
    Member
    Join Date
    Nov 2012
    Location
    usa
    Posts
    108
    Downloads
    0
    Uploads
    0

    Default Re: Saturn 4 X 4 build

    Time to install the limit switches. It seems that the position of the Saturn mounting holes are not optimal.

    The Y mounting holes are precisely in line with the grease fittings. Since the fittings are steel (or brass?), I'm wondering if I could get away with just sensing the fitting itself? Nate, David, or anyone else who has this type of switch, what do you think?


    Ward

    Attached Thumbnails Attached Thumbnails Saturn 4 X 4 build-img_2290-jpg  


  11. #31
    Community Moderator difalkner's Avatar
    Join Date
    Nov 2014
    Location
    United States
    Posts
    724
    Downloads
    0
    Uploads
    0

    Default Re: Saturn 4 X 4 build

    Quote Originally Posted by sybilsurf View Post
    Time to install the limit switches. It seems that the position of the Saturn mounting holes are not optimal.

    The Y mounting holes are precisely in line with the grease fittings. Since the fittings are steel (or brass?), I'm wondering if I could get away with just sensing the fitting itself? Nate, David, or anyone else who has this type of switch, what do you think?


    Ward
    You'll see in my build photos that I moved mine and also added a 1/8" steel bar so sensing would be at max. The location isn't ideal even there because they're right in the 'crush' path if something fails. They should be off to the side but I haven't had time to see how I want to remount mine.

    David

    David
    Romans 3:23
    CurlyWoodShop - www.etsy.com/shop/CurlyWoodShop
    David Falkner - www.youtube.com/user/difalkner
    difalkner - www.instagram.com/difalkner


  12. #32
    Member
    Join Date
    Nov 2012
    Location
    usa
    Posts
    108
    Downloads
    0
    Uploads
    0

    Default Re: Saturn 4 X 4 build

    True, they are in the "path of destruction", but those big rubber bumpers for the X and Y seem like they would save the switch. But I'm wondering if the mass of the grease fitting might be enough to trigger the proximity switch?


  13. #33
    Community Moderator difalkner's Avatar
    Join Date
    Nov 2014
    Location
    United States
    Posts
    724
    Downloads
    0
    Uploads
    0

    Default Re: Saturn 4 X 4 build

    Quote Originally Posted by sybilsurf View Post
    True, they are in the "path of destruction", but those big rubber bumpers for the X and Y seem like they would save the switch. But I'm wondering if the mass of the grease fitting might be enough to trigger the proximity switch?
    I seriously doubt the rubber bumpers will protect the sensor. My motors are 637 oz. in. and they crushed the rubber bumper and Z+ sensor like they weren't even there, and that's only the one motor on Z. Seems like it took about 10 minutes per hole to drill the hardened and stress relieved steel but I didn't trust the grease fitting for any purpose except to get grease into the bearings.


    David
    Romans 3:23
    CurlyWoodShop - www.etsy.com/shop/CurlyWoodShop
    David Falkner - www.youtube.com/user/difalkner
    difalkner - www.instagram.com/difalkner


  14. #34
    Member
    Join Date
    Nov 2012
    Location
    usa
    Posts
    108
    Downloads
    0
    Uploads
    0

    Default Re: Saturn 4 X 4 build

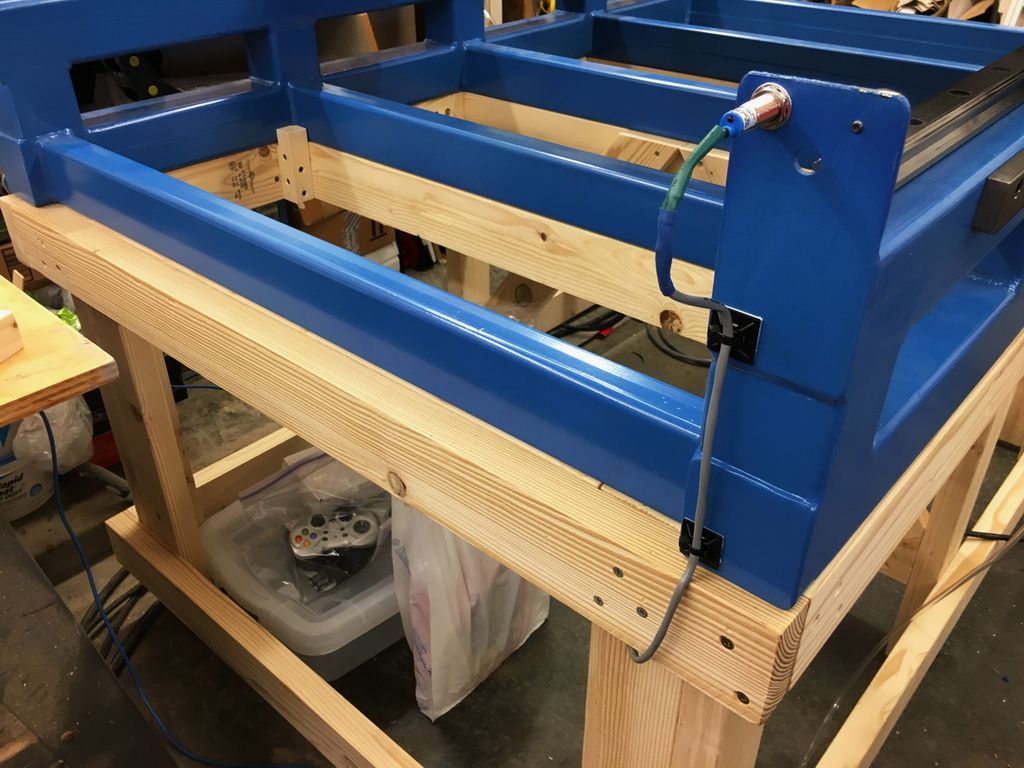
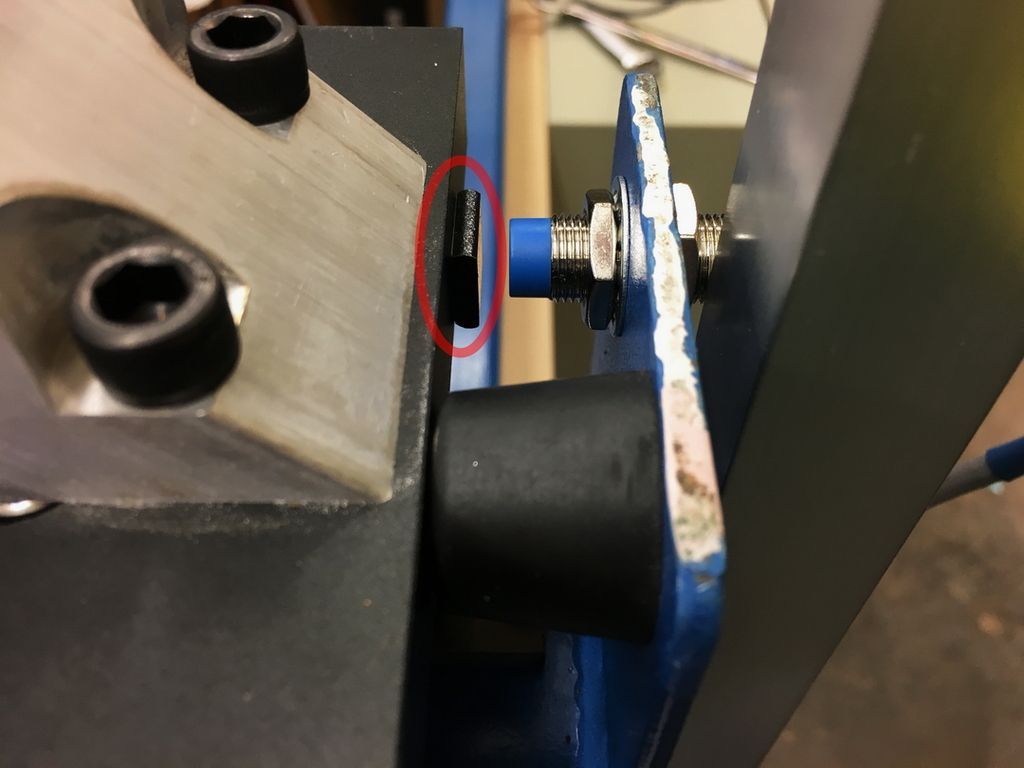
    I Think that I've got a way to solve the proximity switch issue.

    I see that the sensor positions are consistent, right over the rubber wiper for the way carriages. So why not make a steel cover?

    Attached Thumbnails Attached Thumbnails Saturn 4 X 4 build-img_2294-jpg   Saturn 4 X 4 build-img_2295-jpg   Saturn 4 X 4 build-img_2296-jpg  


  15. #35
    Community Moderator difalkner's Avatar
    Join Date
    Nov 2014
    Location
    United States
    Posts
    724
    Downloads
    0
    Uploads
    0

    Default Re: Saturn 4 X 4 build

    Looks good - can you still get a grease gun on the fitting? The sensor is still in the path of destruction so we need to come up with a way to move it to the side in all locations.

    David
    Romans 3:23
    CurlyWoodShop - www.etsy.com/shop/CurlyWoodShop
    David Falkner - www.youtube.com/user/difalkner
    difalkner - www.instagram.com/difalkner


  16. #36
    Member
    Join Date
    Nov 2012
    Location
    usa
    Posts
    108
    Downloads
    0
    Uploads
    0

    Default Re: Saturn 4 X 4 build

    David, if I have to I can remove the plate temporarily to grease the carriages. By the way, how did you handle the X prox sensors? I see that for my way to work I'll have to replace the four bumpers with something shorter.


    Ward


  17. #37

    Default Re: Saturn 4 X 4 build

    Quote Originally Posted by sybilsurf View Post
    David, how did you handle the X prox sensors? I see that for my way to work I'll have to replace the four bumpers with something shorter.


    Ward
    Why do you have to replace the bumpers?

    Fine Line Automation
    www.finelineautomation.com


  18. #38
    Member
    Join Date
    Nov 2012
    Location
    usa
    Posts
    108
    Downloads
    0
    Uploads
    0

    Default Re: Saturn 4 X 4 build

    Quote Originally Posted by FineLineAuto View Post
    Why do you have to replace the bumpers?
    Nate, with the sensor position as it is, it is pointing directly at the rubber carriage wiper. In addition, even if I screw an 1/8" cover over the rubber, with the bumpers bottomed out the carriage only reaches to within about 1/2" of the sensor. I'm thinking that shorter bumpers would allow more X travel to reach the sensor.

    Ward

    Attached Thumbnails Attached Thumbnails Saturn 4 X 4 build-img_2297-jpg  


  19. #39
    Member
    Join Date
    Nov 2012
    Location
    usa
    Posts
    108
    Downloads
    0
    Uploads
    0

    Default Re: Saturn 4 X 4 build

    David, I've been thinking about these proximity switches being in the "path of destruction" and I don't see any way around it. If the "sensed" member is sturdy enough to trust, then doesn't it NEED to be in the path? No kind of ramp would work that I can see. Maybe some sort of "breakaway" piece, but maybe just replacing the broken switch is just the cost of the mistake?

    Ward


  20. #40
    Community Moderator difalkner's Avatar
    Join Date
    Nov 2014
    Location
    United States
    Posts
    724
    Downloads
    0
    Uploads
    0

    Default Re: Saturn 4 X 4 build

    Quote Originally Posted by sybilsurf View Post
    David, if I have to I can remove the plate temporarily to grease the carriages. By the way, how did you handle the X prox sensors? I see that for my way to work I'll have to replace the four bumpers with something shorter.

    Ward
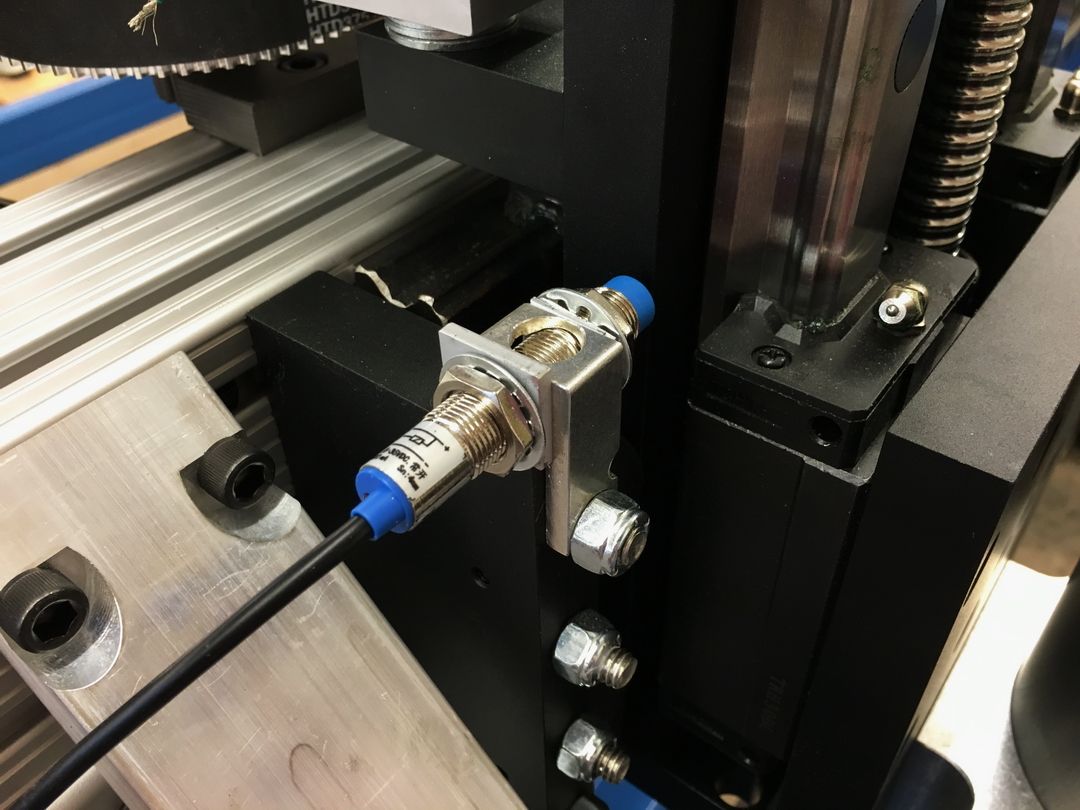
    I don't think they should point at the bearing blocks at all, especially with the rubber/plastic piece on the ends where the sensor is suppose to detect metal. I made a temporary bracket and set them on top; I'll make better ones later but right now these work just fine. Since this photo was taken I have added 1/2"x1/2"x1/8" cold rolled steel where the sensor points so now I get the full sensing capabilities of my sensors.


    David
    Romans 3:23
    CurlyWoodShop - www.etsy.com/shop/CurlyWoodShop
    David Falkner - www.youtube.com/user/difalkner
    difalkner - www.instagram.com/difalkner


Page 2 of 6 FirstFirst 12345 ... LastLast

Tags for this Thread

Posting Permissions

  • You may not post new threads
  • You may not post replies
  • You may not post attachments
  • You may not edit your posts
  •  


About CNCzone.com

    We are the largest and most active discussion forum for manufacturing industry. The site is 100% free to join and use, so join today!

Follow us on


Our Brands

Saturn 4 X 4 build

Saturn 4 X 4 build