")

 Reply with Quote
That is a really nice stand. Great job!
Sent from my iPhone using Tapatalk


That is an amazing stand! You might want to strap it to something heavy when it's outside like that, though, so it doesn't blow away! LOL!
I kind of wish I had gone ahead and lightly skinned mine like that because, like you said, at this point I want to be using the machine and not working on the stand.
David
Romans 3:23
CurlyWoodShop - www.etsy.com/shop/CurlyWoodShop
David Falkner - www.youtube.com/user/difalkner
difalkner - www.instagram.com/difalkner
That is a really nice stand. Great job!
Sent from my iPhone using Tapatalk
Fine Line Automation
www.finelineautomation.com
=======================
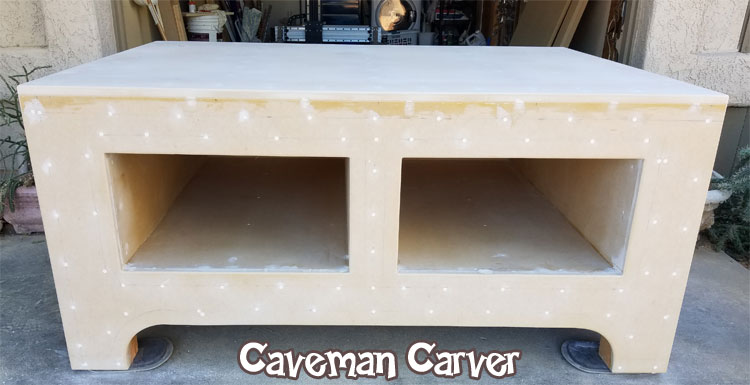
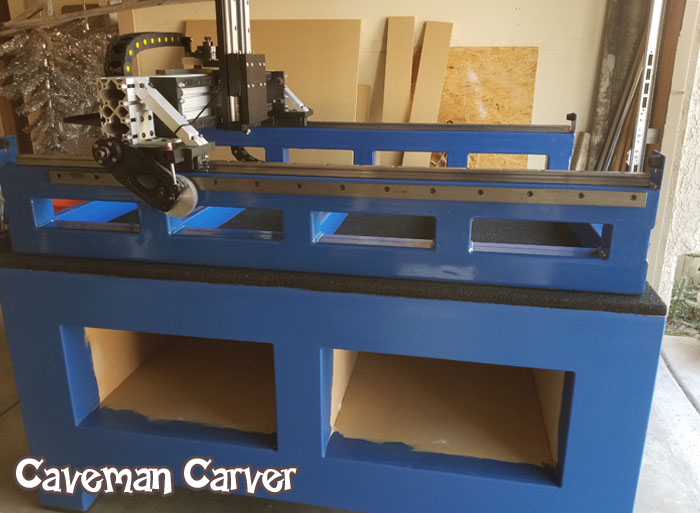
Just a quick update on the CNC Router Stand...
Finished putting on the top, flush trimmed all of the edges and then round cornered everything just to lower the chance of chipping the edges as time goes by. Did all of the filling of the screw holes and then sanded everything smooth...corners and all. Almost finished with the stand except for painting. I plan to start on that tomorrow. Hopefully I can put two coats of paint on this monster and then move on to the actual setting up of the CNC router. Anyway...check the photos if you are interested in how this stand is coming together.
Almost finished with the CNC Router Stand...Front view.
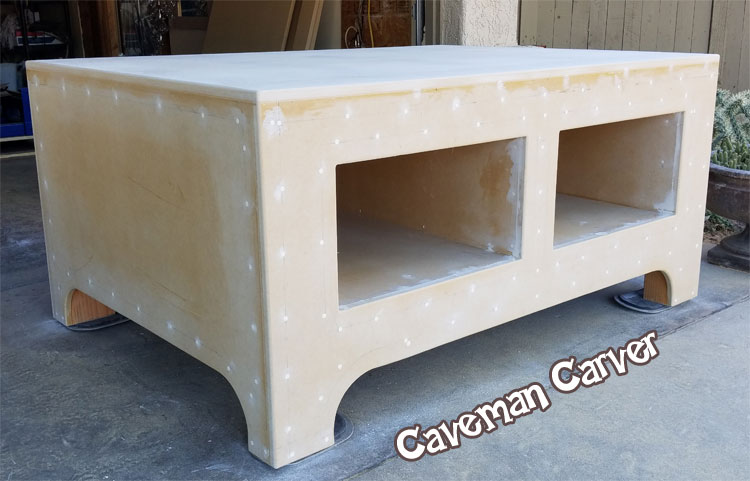
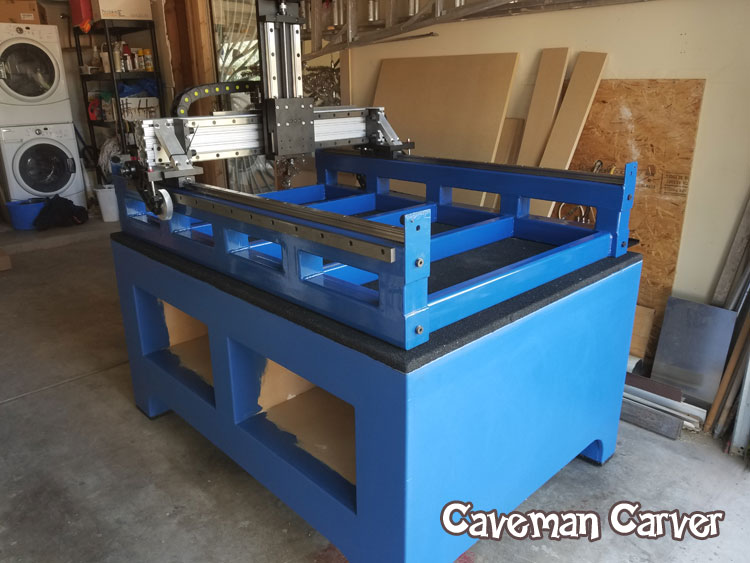
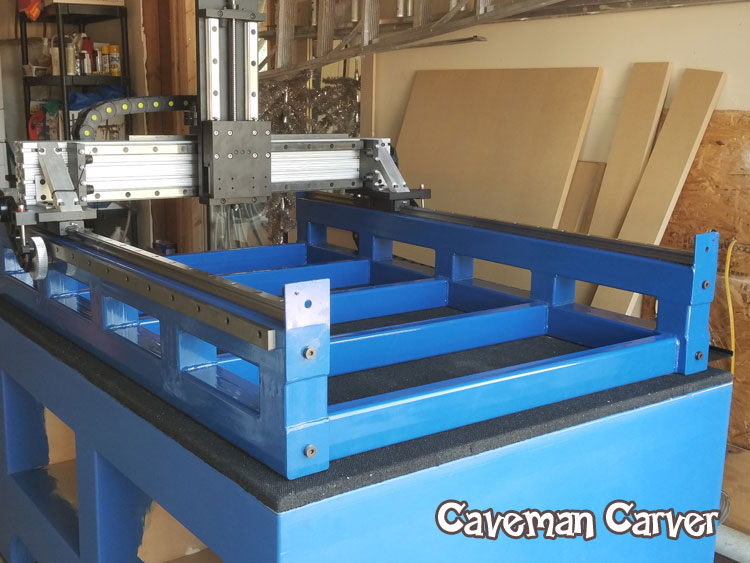
In the main stretch...Left view of the CNC Router stand.
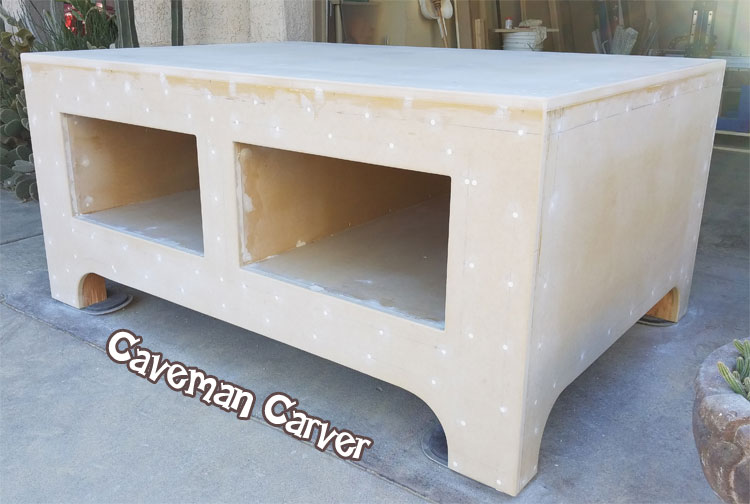
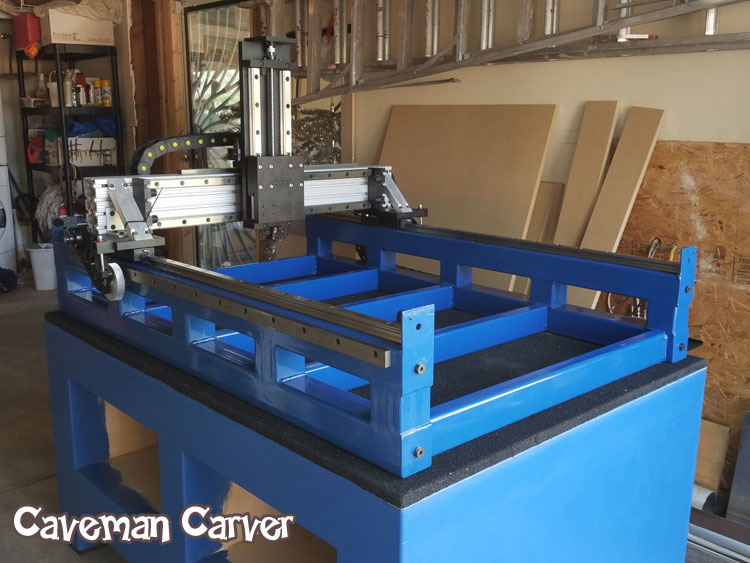
Everything is done on the CNC Router stand except painting. Right View.
Thanks for tuning in.
=====================
Go First Class or don't go at all.
Looks really good! I know it's heavy, probably about 250-275 I would guess. I see you have it on pads of some sort - are you able to move it on those?
David
Romans 3:23
CurlyWoodShop - www.etsy.com/shop/CurlyWoodShop
David Falkner - www.youtube.com/user/difalkner
difalkner - www.instagram.com/difalkner
========================Originally Posted by difalkner

Thanks David...
It is pretty heavy which is why I have the moving pads under the legs. I have eight old moving pads, from Home Depot, left over from when I moved twelve years ago that are still usable. With the pads under the stand I am able to slide it around on the concrete floor with some effort but I can only slide it one side at a time. I am estimating the weight at around 300 pounds but that is just an estimate. I will weigh it when I am finished with it and let you know the "final" weight of the stand. I should be able to finish the stand over the next few days. After that...on to the lifting of the machine onto the stand and then putting together the electronics. I am sure I will have some questions about getting the electronics sorted out though. Thanks again for your comments.
========================
Go First Class or don't go at all.
=========================================
OK Everyone:
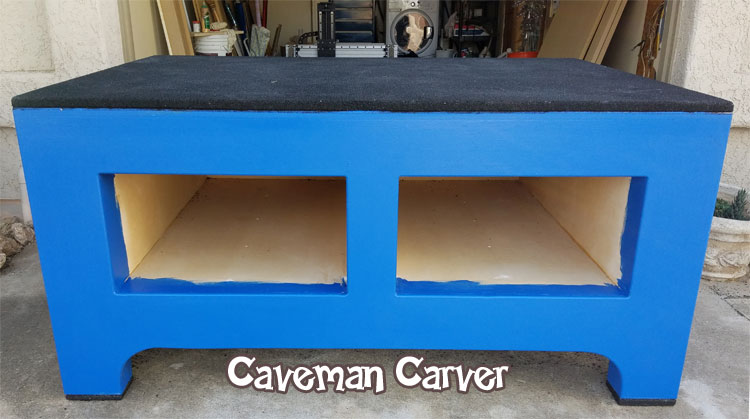
Update again on the new cnc router stand. I really don't have much to say except that I am finished with the stand and am extremely happy with how it came out. It is a rock solid stand that will last a lifetime. I did go ahead and glue (contact cement) 3/4" thick rubber on the bottom of the feet and on the top of the stand. I got the rubber mat on sale this past summer, at a feed store, for $20.00 and thought it would work well for this project. I think the rubber will help to level both the table and router and also keep down the vibration as the router is cutting. It is the kind of rubber mat they sell to put in horse stalls which is a pretty "stiff" rubber. I think it will hold up well.
Other than that...the photos below are pretty much self explanatory.
Front View of the CNC Router Stand
Left Side View
Right Side View
Hoisting The CNC Router Onto the stand
I borrowed an engine hoist from a friend and it only took an hour or so to figure out how to get the CNC Router onto the stand.
Everything went well...A little tense perhaps but not too bad. This is not a very good photo but you get the idea.
CNC Router on the Stand
Another View From Farther Back
Close Up View...You can see the rubber mat I put down in this photo. It is the kind of rubber mat they use in horse stalls.
Final View. Very Happy Overall.
I plan to finish the cubby holes later. I'll put in a couple of drawers on slides for storage and also put up doors to close up the spaces. I will probably mount some router bit holders to the inside of the doors to store all of my bits but again...that will be a project for another day.
The next thing I have to do is clean out the garage and put in a few new electrical circuits. Right now all I have is one 15 amp circuit on the opposite wall which is not nearly enough power to run this machine. I will keep everyone posted as that project progresses. After that I will be building an electrical enclosure for all of the electronics and then on to the actual testing and running of the machine.
Looking forward to getting this done.
=========================
Go First Class or don't go at all.
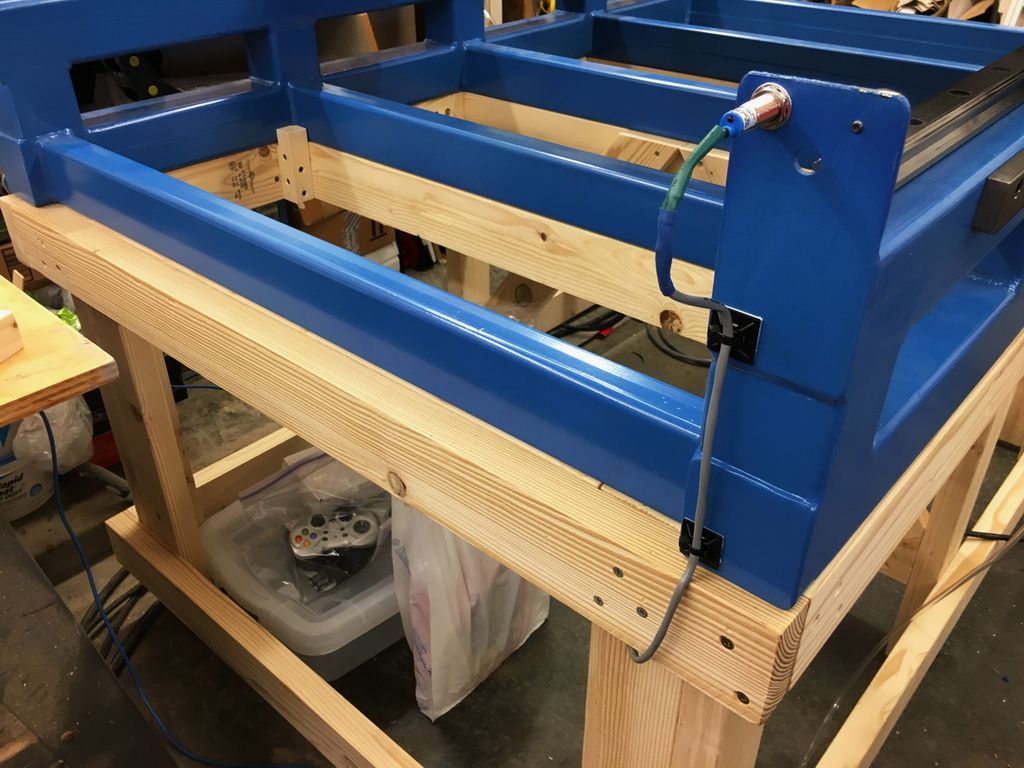
That is a very good looking and sturdy stand! I'm looking forward to the next steps on this build. One thing of note, you may want to look at relocating the proximity sensor holes on the Y axis. As shipped they point directly at the grease fitting so I moved mine over and up a bit. Get ready for a tough time drilling; this stress relieved steel is some hard stuff!
David
Romans 3:23
CurlyWoodShop - www.etsy.com/shop/CurlyWoodShop
David Falkner - www.youtube.com/user/difalkner
difalkner - www.instagram.com/difalkner


Proximity sensors should really not be mounted that way at all. They should be mounted from the side, so they don't get smashed if they don't work for some reason.
Gerry
UCCNC 2017 Screenset
[URL]http://www.thecncwoodworker.com/2017.html[/URL]
Mach3 2010 Screenset
[URL]http://www.thecncwoodworker.com/2010.html[/URL]
JointCAM - CNC Dovetails & Box Joints
[URL]http://www.g-forcecnc.com/jointcam.html[/URL]
(Note: The opinions expressed in this post are my own and are not necessarily those of CNCzone and its management)
I agree, Gerry. If you recall I smashed my Z+ sensor and then started looking at ways to move these on mine but now that I've started using the machine I don't really want to stop and do any mods right now. In the meantime the current location won't work unless the grease fitting is what you want to sense (of which I doubt).
David
Romans 3:23
CurlyWoodShop - www.etsy.com/shop/CurlyWoodShop
David Falkner - www.youtube.com/user/difalkner
difalkner - www.instagram.com/difalkner
Well. There is a screw plug on the other side of the bearing that can be swapped with the fitting.
Hey Guys:
Sorry I have not updated this thread in a while...I got really sick and was pretty much out of commission for almost a year. I spent much of that time seeing doctors but after a few fiascoes in diagnosing the problem, and some fairly minor surgery I am back in action and feeling well. Please, don't ask and I won't tell. Since this is a CNC Forum let's just get on with the machines.
So...I have finally put together most of the electronics for my machine but I am having a major problem getting the motors to run.
I am using the PMDX-126 board and the SmoothStepper board.
Everything seems to be working fine but the motors will not run.
I know the SmoothStepper is receiving data because when I hit the "Reset" button in Mach3 the outline turns green. Also, the "Outputs Enabled" light on the PMDX-126 is on so I am pretty sure it is set up right. All of the jumpers and dip switches are as specified in the documentation for "Normal" mode which is factory specs.
The SmoothStepper is running on it's own 5 volt power supply and that checks out OK.
I am using the following diagram for wiring everything to my Gecko 203 drivers:
www.pmdx.com/PMDX-Forums/index.php?actio...06.0;attach=48;image
The motors are getting power because when I turn on the power supplies you can hear the motors thump indicating they are powered up. Also, you can't turn the motors by hand when the power is on so I know they are getting power.
I have the Ports and Pins in Mach3 setup per the above referenced diagram:
Port 1 Pin 8 Direction Pin 9 Step
Port 1 Pin 6 Direction Pin 7 Step
Port 1 Pin 4 Direction Pin 5 Step
Port 1 Pin 2 Direction Pin 3 Step
I am running Mach3 version R3.043.062
I am not sure which version of SmoothStepper I am running. I do know it is the most current version since I only bought it last year.
Any suggestions as to what I might have missed will be much appreciated. Thank you.
--------------------------
Go First Class or don't go at all.
===========================
OK Everyone:
I got the problem sorted out.
The Gecko 203V drivers use ground, step and direction as their inputs...NOT...common, step and direction like I originally had them wired.
I read through a lot of information when I was buying parts and I don't remember ever reading about these drives using ground instead of common. Anyway, after searching online for a few hours I "stumbled" across the answer.
Problem solved.
=====================
Go First Class or don't go at all.
Glad you got it solved. Have you tried to run a part yet?
Fine Line Automation
www.finelineautomation.com
------------------------------
I have yet to run a part but I am on the verge. The motors are all running very smoothly with very little noise. I am happy and impressed with the SmoothStepper and PMDX-126 board combo. Easy to setup and get going if you have all the settings right.
I still have to setup my limit sensors and my little Z Axis Zero program, which I will just copy over from my old setup. After that I need to setup the 2.2KW spindle; which I am hoping will go smoothly. I have never setup a spindle before but the videos online make it seem fairly straight forward. I guess we will see about that.
I will keep everyone posted and I will post some photos when I finish the wiring.
Getting there is half the fun.
Nate:
Can you please verify the steps per inch I should be using? X, Y, A (Slave) Axis are at 2037.18 and Z Axis is at 10160. Is that correct? I am running the 960 Oz/In motors on all axis. Thanks.
-----------------------------
Go First Class or don't go at all.
Both step values are correct.
Fine Line Automation
www.finelineautomation.com
======================
Hi All:
I am back again with a request for information on how to get Mach3 to control my spindle.
I am using the PMDX-126 board along with the PMDX-107 Speed controller board along with the Hitachi WJ200-022SF VFD and have not been able to get things working. I have been carefully combing through the manuals and have a pretty good grasp of how things should go together but I have yet to find a solution. Here it is...
I have set all of the program parameters for the Hitachi VFD and have been able to get the spindle working perfectly by hitting the "Run" button on the VFD and also adjusting the speed using the controls on the VFD. This was the first step and everything works perfectly.
Here are the Hitachi VFD Program Settings I am using...
A001 (Frequency Source)................01 Control Terminal
A002 (Run Command Source)..........01 Control Terminal
A003 (Base Frequency)...................400 Hz
A004 (Max Frequency)....................400 Hz
A044 (V/f Curve...............................00 Constant Torque
A082 (Spindle Voltage)....................220 Volts
F001 (Output Frequency).................400 Hz
F002 (Acceleration Time).................10 sec
F002 (Deceleration Time).................10 sec
H003 (Motor Capacity).....................2.2 Kw
H004 (MotorPoles)..........................2 Poles
Next, I hooked up the PMDX-107 Speed Controller based on the following info I found by searching online........
Rev/Dir Connect to Logic Input Terminal 2 on VFD
Fwd/Run Connected to Logic Input Terminal 1 on VFD
COM Connected to Terminal P24 on VFD
Aout Connected to Analog Input Terminal "O" on VFD
Agnd Connected to Terminal "L" on lower rail of VFD
I have all of the DIP Switches on the PMDX-107 OFF except switch 3 which is ON because I am using the relays on the PMDX-107 as Run and Direction Control Signals instead of Forward and Reverse Signals.
Everything looks to be running correctly. When I push the "Reset" button in Mach3 I hear the charge pump relays switching on and pin 17 on the PMDX-126 board lights up indicating there is a signal on the charge pump pin. When I push the "Spindle Start Button" in Mach3 the button outline turns yellow and the rpm's move up as if the spindle were running indicating Mach3 "thinks" the spindle is running when it is not. I have gone through everything many times and I am pretty sure I have the wiring wrong from the PMDX-107 to the VFD but I can't seem to come up with any wiring scheme different than what I have. Most of the confusion here is that the terminals on the Hitachi VFD are not clearly marked as to what they are and as far as I can tell the manual does not clearly indicate this info either and not many people out there are using this VFD so information is pretty scarce.
Any ideas from you guys would be very much appreciated.
I am in the final stretch here as I have everything else set up and running smoothly. The only things I have left to do on this machine are...
1. Spindle control through Mach3
2. Automatic (kind of) Z - Zero setting
3. Transferring the dust collection setup from my old machine to this one
After that I can start cutting stuff and you can believe I will be looking forward to that.
Thanks again to everyone out there lending a helping hand.
==========================
Go First Class or don't go at all.
-----------------------
OK Everyone....
I figured out what the problem was and believe it or not I had the Aout wire from the PMDX-107 board attached to terminal 4 of the VFD when it should have been attached to terminal "O" of the VFD. Honest mistake, I guess, as these pins are on top of each other. Anyway, Mach3 now has control of the spindle but now I am getting an error code that states:
pwm bumped to minimum setting
and the spindle won't run.
I have tried tons of combinations of the spindle settings in the Ports and Pins Spindle tab as well as different combinations of the pulley settings and also the settings in the smooth stepper plugin control all to no avail. I have been getting this statement for a few days now and I am at a loss as to how to get rid of it. Mach3 won't run the spindle with this code active.
If anyone out there can help...please do. Thanks.
------------------------
Go First Class or don't go at all.
This means that the commanded rpm is lower than your minimum PWM setting.pwm bumped to minimum setting
For example, say your max RPM is 24,000, and your minimum PWM is 50%. And rpm below 12,000 will result in that message.
So, if your g-code has an S10000, you'll see that message, and the spindle will actually run at 12,000 rpm.
This is to prevent you from accidentally running the spindle too slow.
This has nothing to do with the spindle not running. As long as you actually have set a speed higher than 0 RPM.
Use a meter between the FWD and Common at the VFD to see if the relay is working.
Gerry
UCCNC 2017 Screenset
[URL]http://www.thecncwoodworker.com/2017.html[/URL]
Mach3 2010 Screenset
[URL]http://www.thecncwoodworker.com/2010.html[/URL]
JointCAM - CNC Dovetails & Box Joints
[URL]http://www.g-forcecnc.com/jointcam.html[/URL]
(Note: The opinions expressed in this post are my own and are not necessarily those of CNCzone and its management)