Reply with Quote
Did you ever think of selling it as a kit? It is a great looking build.


Probably one of the best looking machines I've ever seen. In your experience will this be as rigid or more than an 80/20 build?
Did you ever think of selling it as a kit? It is a great looking build.
I know I haven't had any updates for awhile. Sort of recovering financially before ordering the aluminum pieces. I am also designing a router mount in hopes of getting that done at the same time. This weekend I crossed a couple things off of my to-do list. I wanted to make a base for the CNC that would put the CNC surface at about 32 inches off of the ground. I might add storage into it at a later date but since I got a notice that I will be at the Detroit Makerfaire in a month, I sort of have to start moving quickly. I hope to get as much done as possible.
Here is what I settled on for the base. Dimensions are 40" X 68" X 20". It is just 3/4" plywood that will get a simple polyurethane and paint finish. I am waiting for the first coat to dry right now, so I thought I'd post an update during the downtime.
Here is the base, pretty simple Kregg jig construction. Finished it late last night at my workplace. Sort of pays homage to my MDF CNC
Then I needed to put together something for the insert. Since I am setting the machine up for milling, a plain old MDF torsion box would do nicely. Planning for a spindle in the future, but I will likely have to make do with my Bosch for awhile.
Here is an exploded view of the insert. I left some notches in the ribs in case I might want to add a vacuum hold down/vacuum forming function at a later date. You can see some initial sketches on the surface if you look hard enough. I milled a series of extra 5/16" holes to receive some 1/4-20 T nuts for fixturing in the future. Any pattern I would end up doing on the top will have to wait for the Platform CNC to cut it.
Amazing how much easier this stuff is with a CNC
Closeup look.
I thought this was an interesting comparison of the bed sizes. Between my MDF machine and the steel one. Not that much smaller, really.
Here is the insert installed in the machine.
Hope to have more updates soon!
Brian Oltrogge
Grünblau Design Studio
very nice and clean work!
how about epoxy-granite for some area to improve strength?
Thank you very much for your comments! I don't have a lot of experience with a pure 80/20 build. I know 3/16" steel is pretty rigid and I wanted to use 80/20 primarily for the 'bones' of the machine and as an easy system for fixturing.Originally Posted by abs1nth3

That said, you could probably park a car on it, lol
This has been in the back of my mind. I would need to do a batch of them in order to get the price down significantly. This is a prototype and I already have a couple people interested locally. I have no idea of the cost yet. I will be talking to my vendors about quoting a run of 5 of these in the next couple months.
Hmmm machine #3?
I am hoping this one is somewhat portable with 2 people as I am asked to give CAD/CAM classes from time to time. I would like to be able to bring this machine into a classroom environment, especially situations where people do not have direct access to CNC equipment.
Brian
Great up date!
damn that's sexy...
[SIZE="1"]my first..."[B][COLOR="Red"]Big Ape[/COLOR][/B]" CNCRP 2448 [URL="http://www.cnczone.com/forums/cnc_wood_router_project_log/151447-big_apes_crp-2448_build.html"]Build Log[/URL][/SIZE]
Eh Brian, what a terrific design.
I'm one of the guys (Denis L.) who bought your plans for $40 for the MDF CNC. Let me tell you that I don't know if I want to build mine from wood anymore after I saw your new design! It's like comparing the Ford Model T for the early 1900's to a Ferrari LOL.
I'm just joking... Your plans for the MDF CNC are awesome and I'm almost done in cutting all the parts. I should be able to start the assembly soon.
I found that the MDF plans were the best around for a wood CNC. Now I find that this new metal design is super cool and by far the best around!
Denis
I'd say this is one of the most commercially viable builds I have seen on the Zone! I can also see some potential for licensing of the design so that people can get the machine cut/bent locally rather than you trying to supply kits of (heavy) parts from overseas. A company called Marciano Engineering here in my area would easily be able to manufacture the parts you have designed. If you had an agreement with a shop like that, you could take the order and have them make/ship the parts for an agreed amount of money.
Lots of potential!
Looks like fine German engineering. I prefer the look compared to extrusion. The finest looking DIY I've seen. Looking forward to potential kits and pricing.
Beautiful work.
Thank you very much for the comments!
I still love my MDF machine and it is very capable as you will see in this update. The MDF machine paid for itself in the first month I had it, with the DAM light (sold) and a couple other things. I wanted to build my (first) CNC out of wood, so that it was obviously hand made with an opportunity to not have it look like an erector set when finished. When people see stuff you made and say- That's beautiful, you made that on a CNC? You can tell them- I made the CNC too!
I look forward to seeing your updates!
Thank you very much, I wanted it to look professional. I hope to be able to sit back and document everything in August and talk to vendors etc... until then, I am only focused on getting it as complete as possible by the end of the month.
____
I sent the RFQ off this week for the aluminum pieces I also included a clamp for my Bosch router. I hope I will be able to get them before Makerfaire at the end of July.
I am doing a couple of other things while I wait for the aluminum. I finished the base. It is nice to have another work surface...
Then I started making the Platform logo... Kind of an old school frigidaire style script..
I almost sent this out for rapid prototyping and then I remembered that I could use a 60 degree v groove cutter... so I cut this on the MDF CNC. I first milled a curved surface with a 3/8” ball nose then the v groove bit.
After pocketing with an 1/8 bit and a quick coat of polyurethane, I poured some rubber in to make a mold for casting plastic... Here you can get an idea of scale...
Here is the final result... I think it turned out pretty good, I still need to paint it...
Hope to have more updates soon!
Brian Oltrogge
Grünblau Design Studio
Last edited by Grunblau; 07-04-2012 at 02:16 PM.
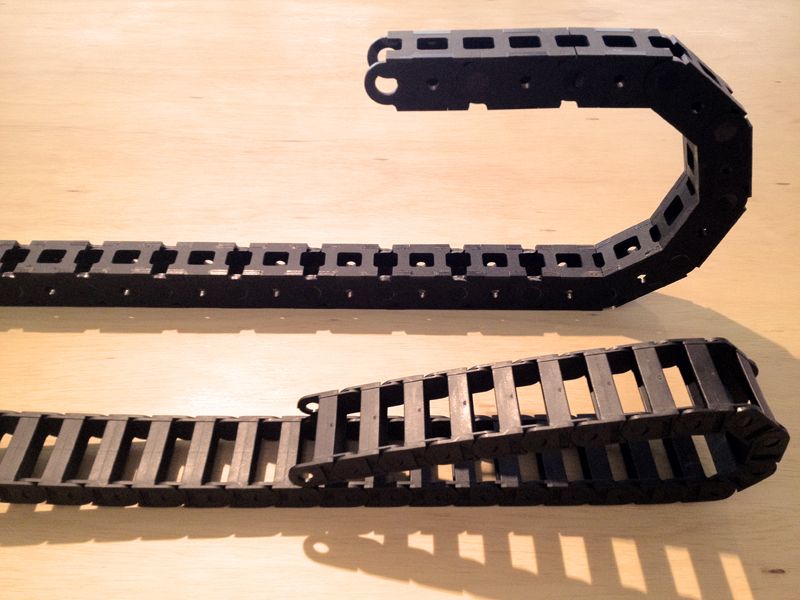
Awhile back I tried my hand at making my own cable carrier... I laser cut these out of 1/8" acrylic and glued them together with acrylic solvent...
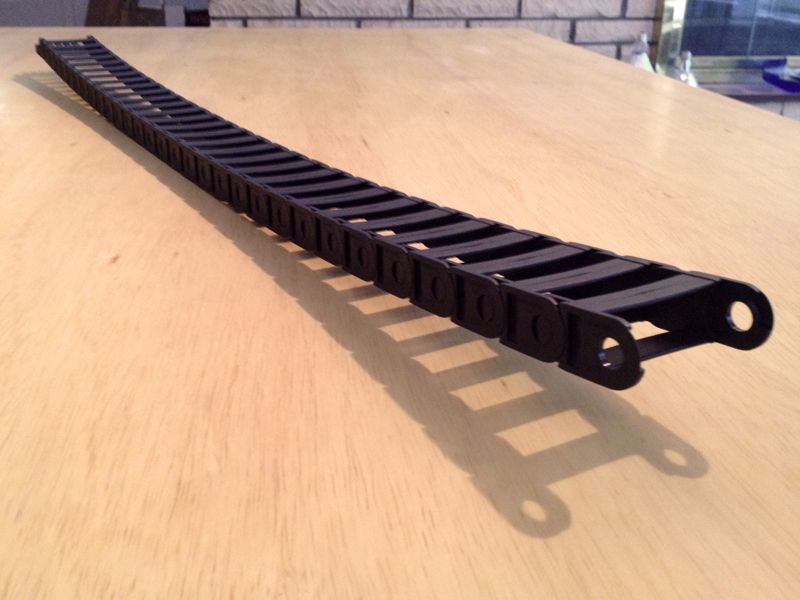
Seems to work fine, but a lot of work.. so I decided to get a legit carrier that I could fit the cords through. After a lot of looking, I settled on this one.
McMaster-Carr
Here is a comparison of the carriers. I might redesign the DIY one at some point, now that I know I could make the bend at a much smaller radius. The major requirement was to fit the DB9 connectors through it.
I expected it to lay flat... Engineered to support the weight of cables?
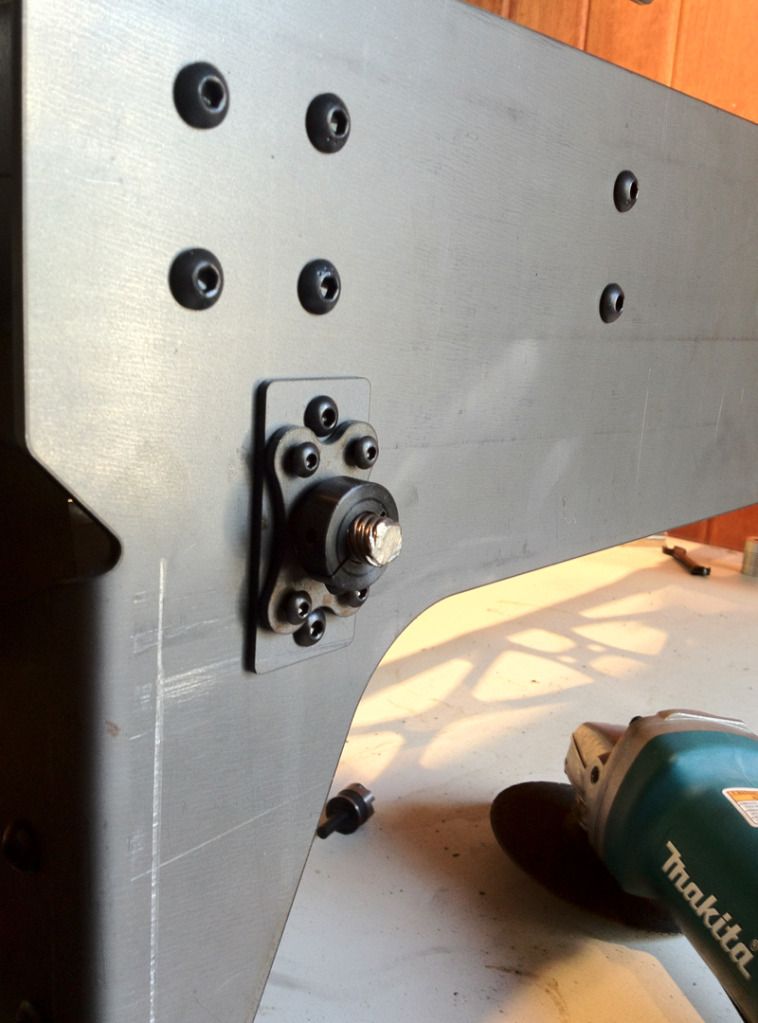
Finally committed to lead screw length... Here you can see how I am putting a bit of tension on the lead screws.
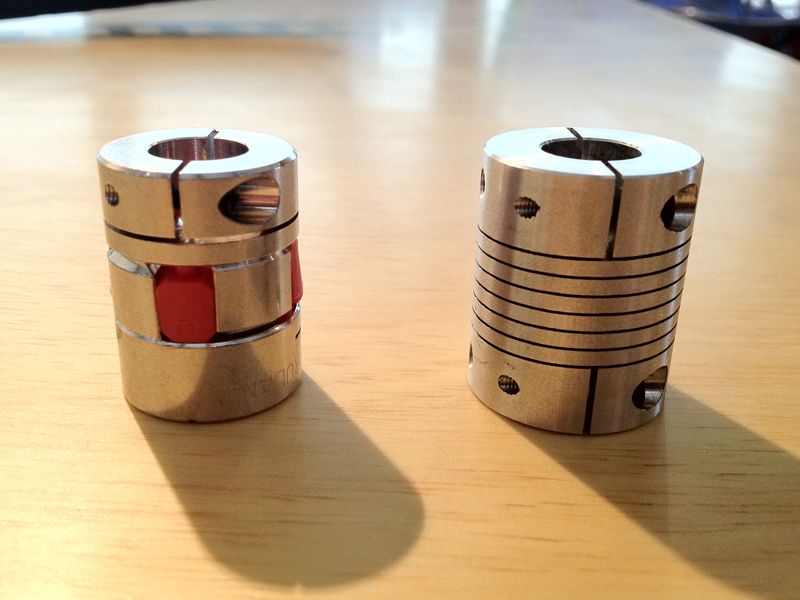
I had to wait to cut them off in order to see the exact size of the new couplers I ordered.
I am sure the spring version would have been fine, I just wanted to try something a bit more direct since I plan on throwing some weight around and misalignment is not a concern. Yet another thing to add to the R&D pile...
Cheers,
Brian Oltrogge
Grünblau Design Studio
The other side of the coin (for me at least) is that, so far, my CNC is way cooler than anything I've made with it...
This is impressive
Grunblau
What plastic do you use I mean could you run me through the process of making that badge looks great.
I assume you used poly urethane to seal the wood then poured rubber into it what kind of rubber is that please.
And then how did you make the plastic badge? just melted some old plastic and poured it into the rubber mould or is it much more involving than that?.
thanks
Thanks! I used Smooth-on Reoflex-30 for the rubber mold and Smooth Cast 300 for the plastic. The polyurethane was mostly necessary to settle the MDF fuzzies and make the mold somewhat durable.
Here are the links to the Smooth-on stuff...
Rubber
Plastic
Both are a part A and B by volume... you mix up the 2 parts and pour. The rubber takes over night and the plastic takes about 10 minutes. It starts out clear and then turns white as it cures.
Here is the process from Smooth-on...
Brian
Last edited by Grunblau; 07-04-2012 at 02:41 PM.
thanks for the reply I will look into this a little more I would like to mould a few plastic parts.
All the best
I broke down the machine today to ready the parts for coating....
Here are all the misc fasteners etc... doesn't look like a whole lot. I wanted to catalog everything while I disassembled so I know how many nuts and bolts I ended up using.
Here are all of the pieces... Not all of them will be orange, the parts that will live under the table will be black.
Hope to hear about the aluminum tomorrow... : )
Brian Oltrogge
Grünblau Design Studio
Currently picking myself off of the floor after getting the aluminum quote... Turns out after sitting on my files for over a week, a big client takes precedence and I wouldn't get the parts until August. This is understandable, and under different circumstances, I could just wait.
Then came the cost. He seems to think that it would take a machinist 4 hours for the 2D uprights @ $80/hour + material costs!

I have a couple more places to ask, but I am starting to think about making it a grunblau tradition of milling the new, more beautiful uprights on the machine itself. I just never thought my first cuts with the new machine would be aluminum. We will see, I still have a lot to do.
I'm off to polyurethane the MDF insert...
Brian Oltrogge
Grünblau Design Studio
The Ali up-rights look fantastic with the inside cutout areas. I guess they were added for weight savings but maybe solid pieces would be less expensive to machine.
However the over-all appearance would not look quite as nice if they were solid.
Thank You.
![Grunblau (Rustbelt) Platform CNC [build log]](https://www.cnczone.com/forums/images/cnczone.png)