Build Thread microCarve A4/Gecko G540 - Page 2


Page 2 of 2 FirstFirst 12
Results 21 to 33 of 33

Thread: microCarve A4/Gecko G540

  1. #21
    Registered saundby's Avatar
    Join Date
    Jan 2007
    Location
    United States
    Posts
    31
    Downloads
    0
    Uploads
    0

    Default Unregulated Power Supply On Its Way

    I've ordered a 38V 15A unregulated power supply to replace my prior power supply. The current is overkill for what I need right now, but it was the closest to what I wanted that's over where I expect to be when I add a fourth axis to this CNC. It'll still be overkill then, but I sure won't have to worry about having enough.

    Hopefully I'll have it by this weekend and be up and running then.

    In the meanwhile, I'll be making a spindle mount in whatever spare time presents itself, so that I can go from dry runs to cutting quickly. I'll be starting out with a cheapo spindle so I won't be out too much when I drive it three inches into the table top.

    -Mark

    http://saundby.com/cnc --my website
    http://catsonkeyboards.blogspot.com/ --my blog


  2. #22
    Registered saundby's Avatar
    Join Date
    Jan 2007
    Location
    United States
    Posts
    31
    Downloads
    0
    Uploads
    0

    Default First Cuts Today

    I finished the spindle mount this weekend, it's a simple affair to get started. I'm going to be making my first cuts with the machine this morning, assuming my initial "cuts" on air go well.

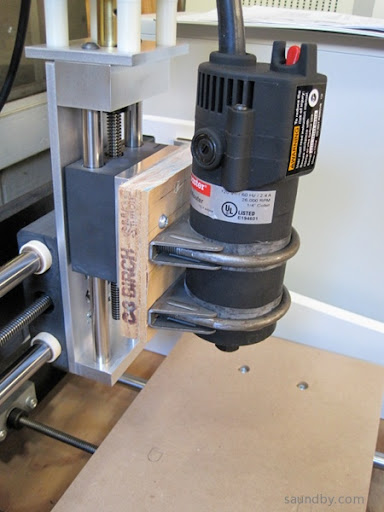
    I'm using an inexpensive Harbor Freight router as a spindle. I mounted it on the Z-axis with a piece of plywood for a baseplate and a pair of muffler clamps to hold the router body. I've placed some strips of inner tube rubber around the router's body to help the grip the clamps have on the router without having to gronk down on the U-bolts too hard.


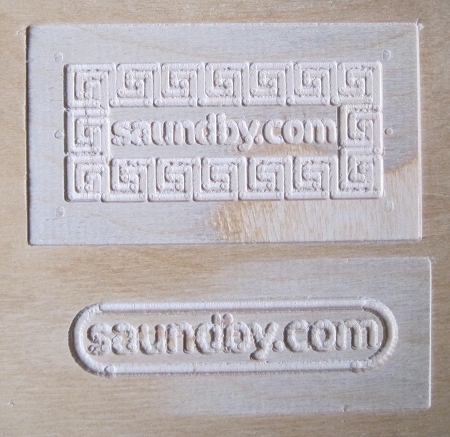
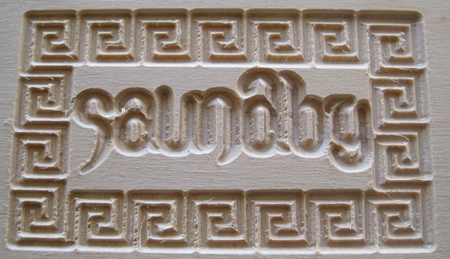
    Now to actually try cutting some material...

    -Mark

    http://saundby.com/cnc --my website
    http://catsonkeyboards.blogspot.com/ --my blog


  3. #23
    Registered saundby's Avatar
    Join Date
    Jan 2007
    Location
    United States
    Posts
    31
    Downloads
    0
    Uploads
    0

    Default First Cut Complete!

    OK, cutting air showed me I needed to do some additional adjustments to the software (invert the Z and Y axes), then I grabbed some scrap plywood and mounted it. The piece I cut on top has wood screws holding it from underneath.

    I converted an image file to a rasterized cut, so the bottoms of the cuts aren't as clean as they would be using real CAD/CAM to guide the router to cut the shapes of the letters and all. Basically I just grabbed what was at hand to do a quick and dirty job here.

    The depth of cut is 1/8", the material is some old, somewhat dry birch plywood recovered from a failed project. The bit is 1/2" 90 degree.


    Edit:

    Here's the results of my second go. A bit more complex pattern. I spent way too much time trying to tweak the gcode before the run, so that's all I've got to show for the day. It's also time to get a finer bit.


    Last edited by saundby; 05-02-2011 at 10:15 PM.
    http://saundby.com/cnc --my website
    http://catsonkeyboards.blogspot.com/ --my blog


  4. #24
    Registered saundby's Avatar
    Join Date
    Jan 2007
    Location
    United States
    Posts
    31
    Downloads
    0
    Uploads
    0

    Thumbs up Started learning gcode to drive the A4

    I started learning gcode yesterday to use my A4 more efficiently. Here's the result of my first gcode program:


    The full story is on my blog:
    Learning GCode with EMC2

    http://saundby.com/cnc --my website
    http://catsonkeyboards.blogspot.com/ --my blog


  5. #25
    Registered saundby's Avatar
    Join Date
    Jan 2007
    Location
    United States
    Posts
    31
    Downloads
    0
    Uploads
    0

    Default First Attempt at Precision


    I used GCode to get the design.

    Full account on my blog:
    An Infinite Number of Cats on Keyboards: First Attempt at Engraving an IC with my CNC

    http://saundby.com/cnc --my website
    http://catsonkeyboards.blogspot.com/ --my blog


  6. #26
    Registered
    Join Date
    Mar 2007
    Location
    US
    Posts
    217
    Downloads
    0
    Uploads
    0

    Default

    Saundby,

    I too am a recent, proud A4 owner! (Pictures of my build are on pg 57 of John's thread: http://www.cnczone.com/forums/diy-cn...achine-57.html ). After an extended bout with Win7 & Mach3, I finally have everything running to my satisfaction (switched to WinXP, lol). Tuesday I actually used my A4 to make a part for my "minnow tank" (I own a fishing tackle store), and it turned out perfectly!

    I have some V-bits on order, and hope to do some PCB work when they arrive. I noticed your IC engraving, and was curious if you have done/plan to do any PCB work? I have read a ton, and am currently planning on starting with Eagle & pcb-gcode.ulp . I am more familiar with Altium's products (and quite honestly find Eagle very clumsy in comparison), but the cnc support for the Eagle appears to be first rate and "easy". My first PCB attempt is going to be an LED board to replace the "circle line" fluorescent bulb in my desk magnifying glass, LOL.

    I did not notice any limit switches on your A4; I assume you have given them some thought? I initially thought, "limit switches are for people who are too cautious." Of course, after a couple of crashes I am now "one of those people who wants some safety features." LMAO. I will post something about them in John's thread, he likely already knows the best answer...

    Another thing that I dismissed out of hand prior to actually using my A4 was a "dust cabinet". After my first "practice cut session" (a "sample" file from V-Carve of a Marlin), I quickly realized the value of an enclosure and set off building one. That took a couple of days, but was WELL WORTH the effort! (My A4 currently resides in my "game room", a 900sqft finished room with hardwood floors, big screen TV and a pool table. Took 2 hours to cut the marlin, 4 hours to clean up the mess!) The noise difference is amazing as well. I built "panels" from 3/4" x 1" strips covered with 1/8in luan and filled with 3/4in foam. It is basically a 34 inch cube with a "45" cut out for a view window/access panel. I can now run my spindle day or night w/o disturbing my bride :-) (much, LOL).

    My build uses a G540 & Keling steppers (the ones recommended for the G540), Bosch Colt for a spindle, with the K2CNC mount John reccomends, a solara power supply (48V 12A I found on ebay for $28 including shipping!) a think&tink set of collets for the Colt, a couple hundred carbide bits & drills from various ebay vendors and my cabinet. I need to add a 12V/5V PSU, spindle relay, limit switches, vacuum relay, "cooling hoses" to direct air flow from the vacuum to the steppers, G540 & tool tip and more in-cabinet lighting (I currently have three "LED Pucks" but plan to replace them with some brighter LEDs & a uController based dimmer).

    And finally, have you looked @ the Arduino based controller? It sounds like it would be right up your alley. I plan on getting an Arduino and playing with it. I am very familiar with AVR assembler language/programming (though I am woefully ignorant of "C") and am hoping that the new 2560 based Arduino might be able to handle a 4th axis, even though it should have plenty of memory resources, it may not be fast enough to crunch the numbers, but I figure I can worry about that when I get a 4th axis, LOL. (I am probably the only person on earth who finds assembly language easier than C! I really need to dedicate some time to learning C.)

    I hope it doesn't appear that I am attempting to hijack your thread, I just had several thoughts in response to your build that are closely related to me and my build. Thanks for posting your build log, I hope we can compare notes on our A4s!

    Fish


  7. #27
    Registered saundby's Avatar
    Join Date
    Jan 2007
    Location
    United States
    Posts
    31
    Downloads
    0
    Uploads
    0

    Default

    Yup, I'm planning all pretty much the same things you are. I'll be upgrading and improving my setup in between spates of actually using it.

    Limit switches will probably come pretty soon. I'll be opening up my controller/power supply case to punch through some holes for connectors, I'll probably put in connectors for both limit switches and a spindle motor relay.

    I've also been planning an enclosure since before the A4 arrived. It's too big for a 1.1 meter equipment rack I've got, but I want to build something similar that's sized right for the A4. I'll be using homosote board and plexiglas to trap sound and dust, there'll be a vacuum in the bottom (with its own noise damping) to help with dust control. I've been moving my paper drawings to CAD, I'll probably post them when I'm getting close to building. That may not be till the end of summer, but I'll probably get the frame built, at least. I need to get my CNC off my workbench!

    I'll be doing PCBs at some point as well. I've been trying to turn up my supply of FR4 between other jobs, once I find some I'll probably do a little one-sided board for a simple AVR circuit just as a test of concept. I'm getting pretty good at levelling my work and all, I feel pretty confident I can manage it. The big question will be what I do the PCB designs in, and what CAM package I'll use to generate gcode. For the first board I'm expecting to code it by hand. PCB geometry is a lot simpler than the decorative woodwork I've been working on this past week or so.

    Sorry to hear you've had some crashes with your CNC! I've managed to avoid it, so far (knock on wood). I've gotten pretty good at using the software limits in EMC2, though. I started out re-running the setup program for each job, setting the axis movement limits on a job-by-job basis to keep me from hitting the ends of the rails. Now I've got two setups I use regularly, that I've gotten used to. One has the origin at the lower left corner of the table, the other has the origin at the center of travel. Between the two I can pretty well set up my work and not end up with crashes. Before I run each program, I manually command the head to move close to the limits, check that there's room, then move it to those limits manually a bit at a time. If necessary I change my zeros. It's a bit time-consuming, but it prevents crashes.

    Putting in the limit switches will let me be a _little_ more cavalier about my setup, but on the other hand I don't want a job ruined by hitting a limit switch, either. So I'll probably keep being pretty cagey before I click the "run" button. As it is, I've settled into a few standard ways of setting up the job on the table, which makes things go more easily.

    On Arduinos, yeah, they look pretty cool. I've been working with "bare metal" AVRs since they first came out (lessee, the AT90S1200, IIRC), so I haven't had a project to use an Arduino on yet. I'll probably pick one up to play with for the heck of it sometime. Right now I've got a few other projects to finish first--like an 8085 based computer (I need to at least finish a releasable version of a basic OS for it) and an 1802-based computer called the "Membership Card", a close relative of the COSMAC Elf computer. I probably only need a solid day's work to finish that up, I'm doing up a sort of "steampunk" case for it, which is nearly complete. Compared to that, the electronic part will be a breeze.

    http://saundby.com/cnc --my website
    http://catsonkeyboards.blogspot.com/ --my blog


  8. #28
    Registered saundby's Avatar
    Join Date
    Jan 2007
    Location
    United States
    Posts
    31
    Downloads
    0
    Uploads
    0

    Default microCarve A4 Assembly and HF Router Mount quickie.

    I've posted instructions on assembling the microCarve A4 itself on my website. I've also posted my design for a simple spindle mount for the Harbor Freight #44914 router (or equivalent, they have sold others with the same mold line). Both are in the new CNC wing of my website:

    saundby.com: CNC Machining

    Any corrections or other feedback appreciated.

    http://saundby.com/cnc --my website
    http://catsonkeyboards.blogspot.com/ --my blog


  9. #29
    Registered saundby's Avatar
    Join Date
    Jan 2007
    Location
    United States
    Posts
    31
    Downloads
    0
    Uploads
    0

    Default Re: microCarve A4 Assembly and HF Router Mount quickie.

    Well, I'm still using my Microcarve A4 over six years later. A lot of things that were "temporary" when I built the machine are still that way, but so long as it doesn't get in the way of the work, it's OK.

    The spindle mount is still the piece of plywood with U-bolts, but augmented with bits of inner tube rubber to hold onto the router better and damp out vibrations a bit. The Harbor Freight router was starting to get some sizeable runout, so I was planning to replace it but it let the smoke out so I had no more reason to delay. The second one is on the machine now. It has more runout than the first one, but it's good enough for what I'm doing now. I'll get something better when I need more precision.

    Here's something I made recently, a birthday present for a friend. I spent 4 hours designing it in ZBrush, cut it in 5 hours on the machine, then spent about 8 hours in hand finishing. The oil isn't dry on the last of the pictures I took, and I cleaned up the rough surface with a scraper before I stuck it in a gift bag five minutes before its recipient got to the door. I put the Microcarve in a sound box and brought it in the house since my last posts on it, it makes it really convenient to turn things out without worrying about the weather in my shop.

    microCarve A4/Gecko G540-20170728_161332-jpg
    microCarve A4/Gecko G540-20170728_021318-jpg
    microCarve A4/Gecko G540-20170728_032235-jpg

    http://saundby.com/cnc --my website
    http://catsonkeyboards.blogspot.com/ --my blog


  10. #30

    Default Re: microCarve A4 Assembly and HF Router Mount quickie.

    What ever happened to Microcarve? It looked promising...whoever was pushing it appears to have evaporated.

    Quote Originally Posted by saundby View Post
    Well, I'm still using my Microcarve A4 over six years later. A lot of things that were "temporary" when I built the machine are still that way, but so long as it doesn't get in the way of the work, it's OK.

    The spindle mount is still the piece of plywood with U-bolts, but augmented with bits of inner tube rubber to hold onto the router better and damp out vibrations a bit. The Harbor Freight router was starting to get some sizeable runout, so I was planning to replace it but it let the smoke out so I had no more reason to delay. The second one is on the machine now. It has more runout than the first one, but it's good enough for what I'm doing now. I'll get something better when I need more precision.

    Here's something I made recently, a birthday present for a friend. I spent 4 hours designing it in ZBrush, cut it in 5 hours on the machine, then spent about 8 hours in hand finishing. The oil isn't dry on the last of the pictures I took, and I cleaned up the rough surface with a scraper before I stuck it in a gift bag five minutes before its recipient got to the door. I put the Microcarve in a sound box and brought it in the house since my last posts on it, it makes it really convenient to turn things out without worrying about the weather in my shop.


  11. #31
    Member Bubba's Avatar
    Join Date
    Mar 2004
    Location
    lagrange
    Posts
    1804
    Downloads
    27
    Uploads
    0

    Default Re: microCarve A4/Gecko G540

    I believe John started having some health problems along with other things that left no time for this development. His forum is still alive, but there is no traffic even from users.

    Art
    AKA Country Bubba (Older Than Dirt)


  12. #32
    Member
    Join Date
    Aug 2009
    Location
    USA
    Posts
    291
    Downloads
    0
    Uploads
    0

    Default Re: microCarve A4/Gecko G540

    I'm only aware of what's been posted on the forum and it's hazy as it's been a while. Couple years back there were new parties involved to take over the production and several long discussions of up-coming kick-starters which never materialized. Machines were going to get bamboo ply sides and there were some other changes/improvements. From 4/15 to 4/16 when things just died. Oh, here from the way back machine:
    https://web.archive.org/web/20170816...ad.php?tid=321

    Hope that works, there is no one manning it so no new registrations. If I recall correctly (and that's getting harder and harder to do) there was some communication issue with the new parties as in they all or most disappeared.

    Speculating,... kickstarter was sort of flooded with cnc routers and you had to have the nitchy toy at the right price point to stand out. The promo videos were becoming very professionally done and I recall at the time machines were appearing with 3d printer heads and lasers to make 3in1s. Not to mention trying to improve and expand as the extruded aluminum engraver market took off. I don't think they thought they'd see a return.


  13. #33

    Default Re: microCarve A4/Gecko G540

    Cool...thanks for digging that up!

    Quote Originally Posted by rocketflier View Post
    I'm only aware of what's been posted on the forum and it's hazy as it's been a while. Couple years back there were new parties involved to take over the production and several long discussions of up-coming kick-starters which never materialized. Machines were going to get bamboo ply sides and there were some other changes/improvements. From 4/15 to 4/16 when things just died. Oh, here from the way back machine:
    https://web.archive.org/web/20170816...ad.php?tid=321

    Hope that works, there is no one manning it so no new registrations. If I recall correctly (and that's getting harder and harder to do) there was some communication issue with the new parties as in they all or most disappeared.

    Speculating,... kickstarter was sort of flooded with cnc routers and you had to have the nitchy toy at the right price point to stand out. The promo videos were becoming very professionally done and I recall at the time machines were appearing with 3d printer heads and lasers to make 3in1s. Not to mention trying to improve and expand as the extruded aluminum engraver market took off. I don't think they thought they'd see a return.


Page 2 of 2 FirstFirst 12

Tags for this Thread

Posting Permissions

  • You may not post new threads
  • You may not post replies
  • You may not post attachments
  • You may not edit your posts
  •  


About CNCzone.com

    We are the largest and most active discussion forum for manufacturing industry. The site is 100% free to join and use, so join today!

Follow us on


Our Brands

microCarve A4/Gecko G540

microCarve A4/Gecko G540